How to Remove Microsoft Account from Windows 10 with/without Password
Microsoft account is likely the doorway to all the cool Microsoft services out there. Having a Microsoft account is paramount if, and you want to enjoy all the Microsoft services to their fullest, for example, Windows (Windows 8, 8.1 and 10), Microsoft Store, Skype, OneDrive, and MS Office etc.
Using Windows 10? Microsoft account is an integral part of the entire Windows 10. Having a Microsoft account set offers seamless integration with Microsoft products and services. However, many users (including myself) prefer having the classic-style local user account for multiple reasons.
In this article, we’ll have a look at how to remove Microsoft account from Windows 10 and shift to a local user account instead.
- Part 1. How to Remove Microsoft Account from Windows with Password
- Method 1. Convert Microsoft Account into a Local User Account
- Method 2. Remove Microsoft Account in Windows 10 from Control Panel
- Method 3. Remove Microsoft Account from Windows 10 Using Netplwiz
- Part 2. How to Delete Microsoft Account in Windows 10 without Password
Part 1. How to Remove Microsoft Account from Windows with Password
Method 1. Convert Microsoft Account into a Local User Account
As long as you have access to your Microsoft account, switching to a local account is much, much simpler. Windows 10 features a built-in feature to switch to a local account from Microsoft account. All you need to do is just click a few buttons and enter some information. Ready? Let’s jump right into the simplest guide to remove Microsoft account from Windows 10!
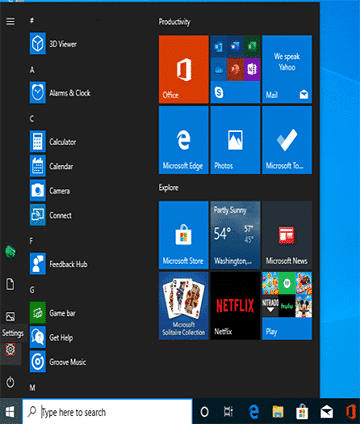
First, go to Start menu >> Settings.
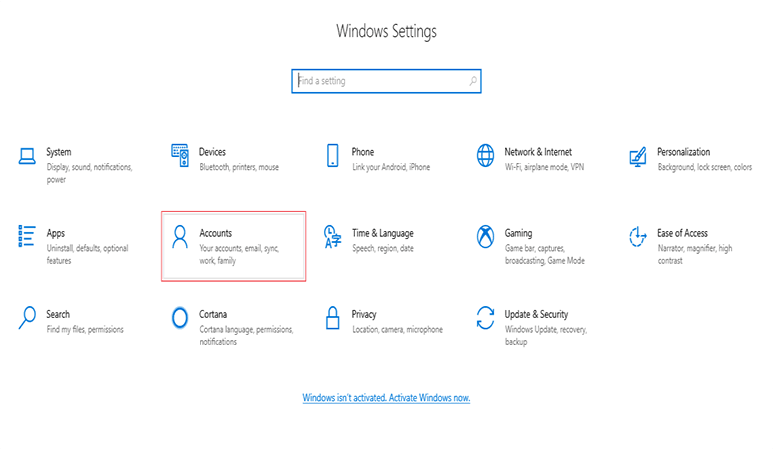
From the “Settings” app, click “Accounts”.
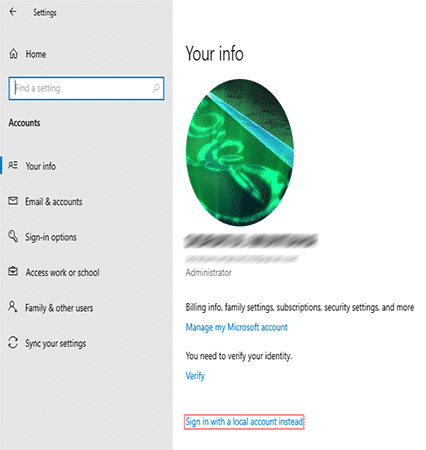
As you can see, I’m already logged in to my Microsoft account. To make the switch to a local account, click the option labeled “Sign in with a local account instead”.
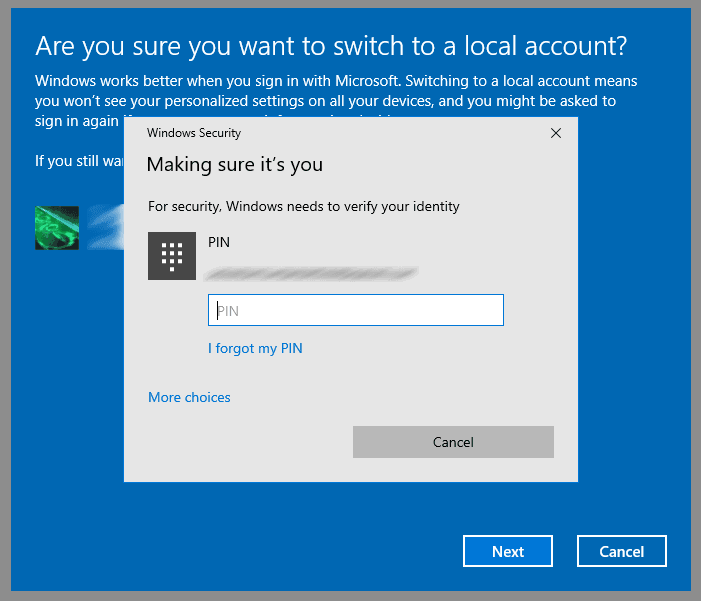
A warning window will pop up asking for confirmation if you really want to make the switch. Click “Next” to continue.
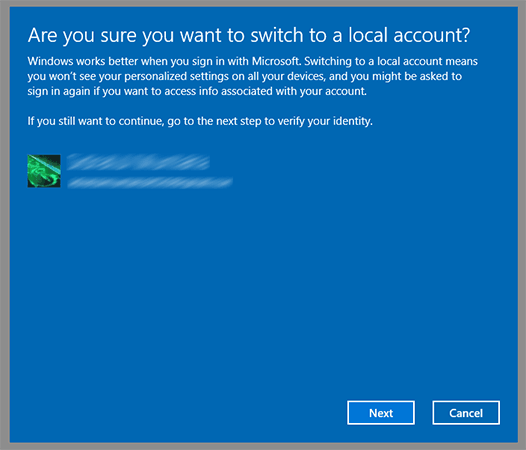
If you had set a PIN for login, enter the PIN to confirm that it’s you performing the action.
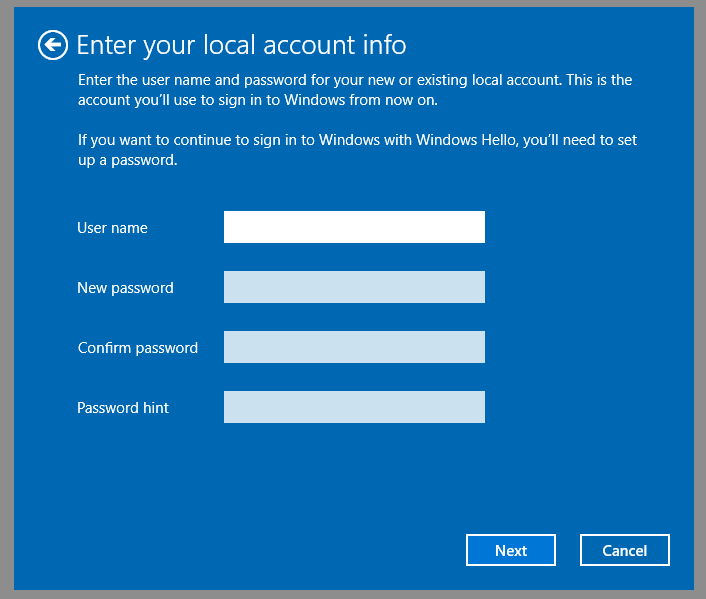
Enter the credentials for the local user account.

Voila! You’ve successfully transitioned to a local account! Click “Sign out and finish” to complete the process.
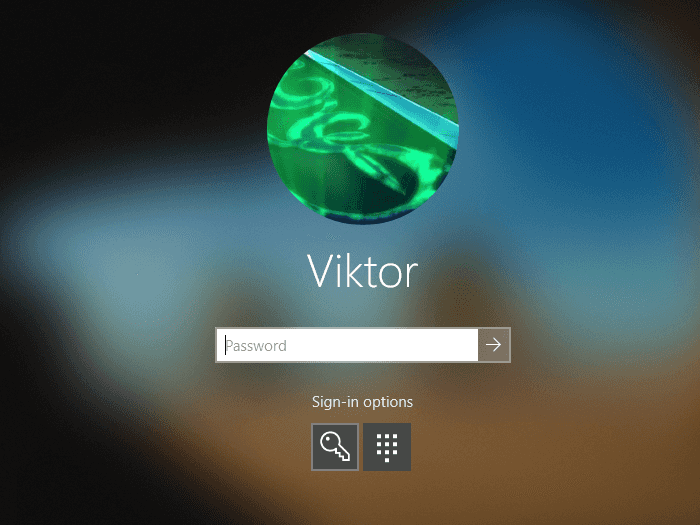
Finally, log in to your local account.
Method 2. Remove Microsoft Account in Windows 10 from Control Panel
Here’s another way on how to delete Microsoft account in Windows 10 and switch to a local account. In this method, we’ll create an alternative local account with administrator privilege. Then, we’ll remove the previously existing Microsoft account from the system for good.
Note: In this method, you may lose access to your important file(s) that were stored in the account-specific locations (Desktop, Documents, Downloads, etc.). Before proceeding, make sure that you’ve backed up your necessary file(s) and folder(s).
Ready? Let’s get started!
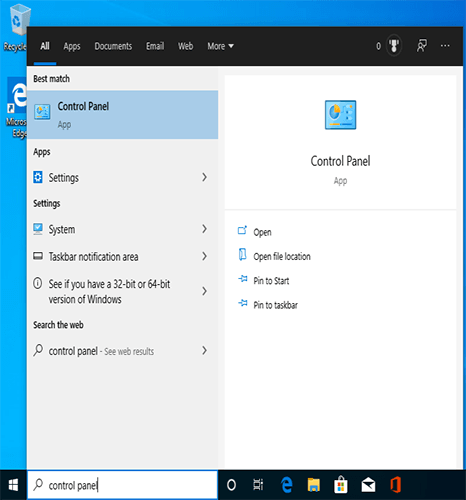
First, we need to access the Control Panel. Search for “Control Panel” in the Start menu.
Go to “User Accounts”.
Click “Manage another account”.

Control Panel will show a shortlist of all the currently available user accounts on the system. In this example, as there’s only one user account, we can’t delete the current user. We have to create a new user account first. Click “Add a new user in PC settings”.
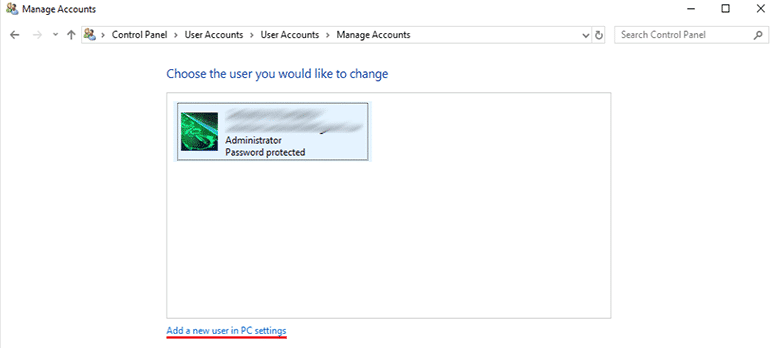
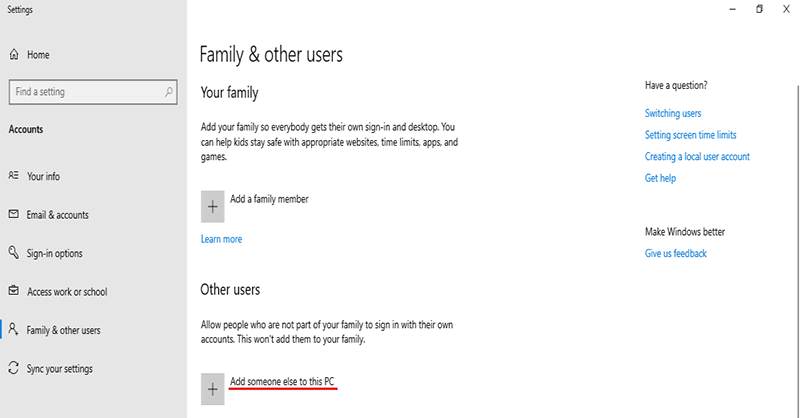
Control Panel will fire up the Settings app. To add a local account, click “Add someone else to this PC”.
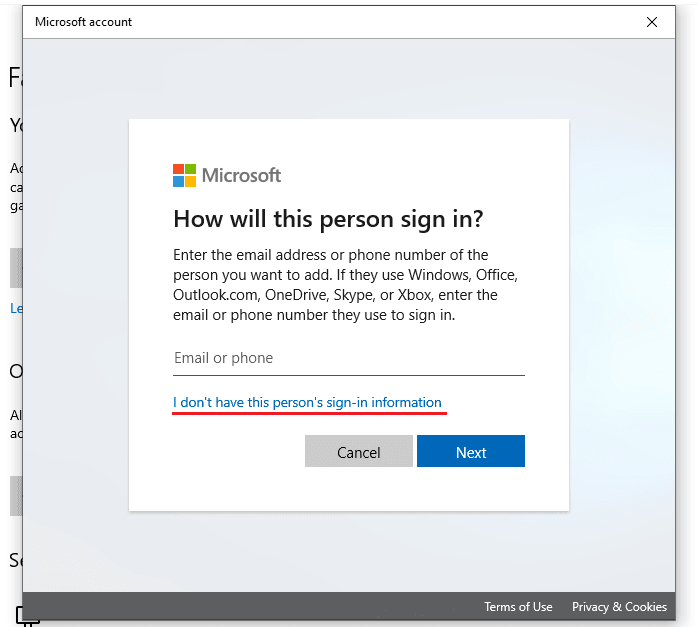
By default, Windows will offer a login to Microsoft account. However, that’s not our goal. Click the link “I don’t have this person’s sign-in information”.
Click “Add a user without a Microsoft account”.
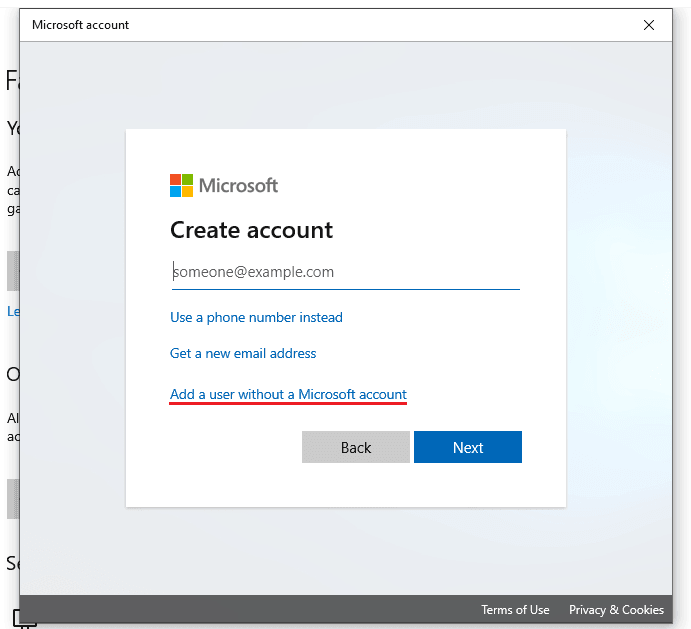
The form for a new user will start. Enter the credentials for the new user account.
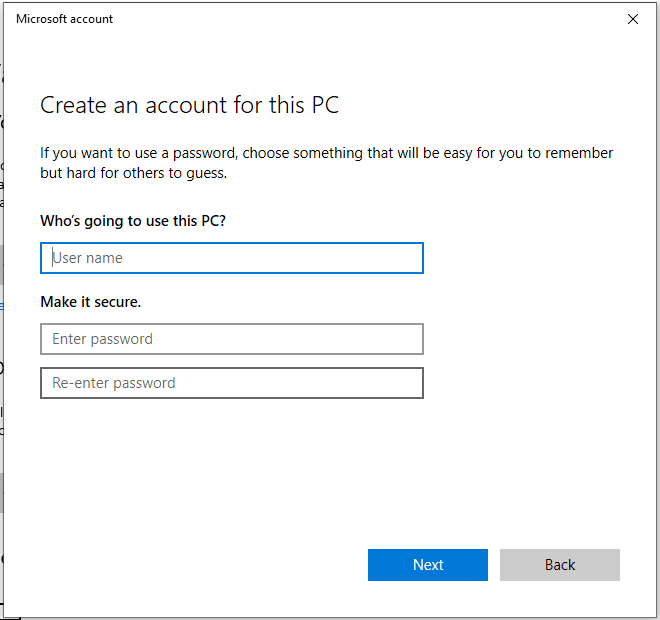
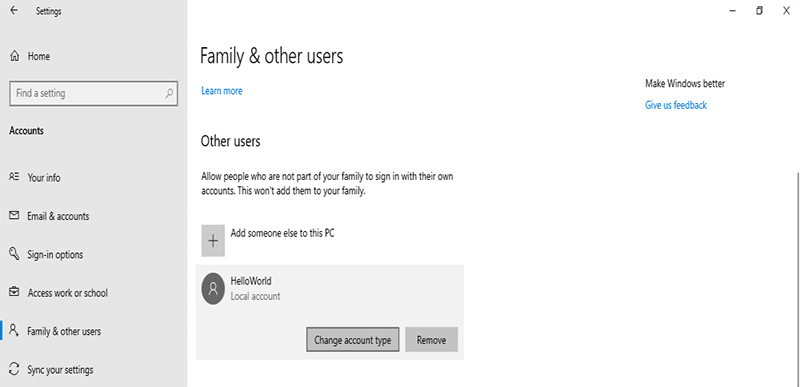
Now, we need to assign the account as an administrator. Click the account under the “Other users” section and select “Change account type”.
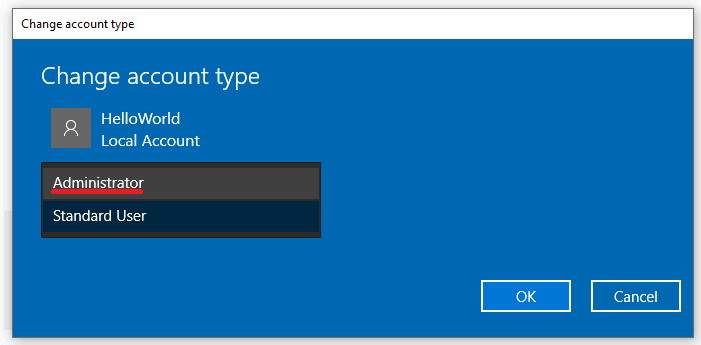
From the drop-down menu, select “Administrator” and hit “OK”.
Voila! A new administrator account is successfully created! From now on, this will be your new account. Now, Windows will allow removing the Microsoft account as that user. Log out of the current user and log in to the new one. Once logged in, go to Control Panel >> User Accounts >> Manage another account.

Double-click the account you’d like to delete. In this case, it’s the Microsoft account.

Click “Delete this account”.

Windows will offer you various options. It’s possible to keep the user-specific file(s) and folder(s) of the user. Select the option that suits you best.
Click “Delete account” to confirm the action.

Voila! You’ve successfully removed Microsoft account from laptop or desktop computer and switched to a local user account!
Method 3. Remove Microsoft Account from Windows 10 Using Netplwiz
The next method is going to follow a bit more critical path than the previous methods. Here, we’re going to remove the Microsoft account from a special Windows tool. However, it’s probably the shortest method in this entire guide. Let’s have a look at how to remove Microsoft account from Windows 10 using netplwiz.
Note: Just like method #2, we’ll be deleting the Microsoft account from the system and switch to a local user account. This requires a pre-existing administrator account that you have access to. If no other account exists, create one (check method #2). Don’t forget to back up essential file(s) from the account you’re about to delete!
Ready? Let’s get into it. Fire up the Run tool by pressing “Win + R”.
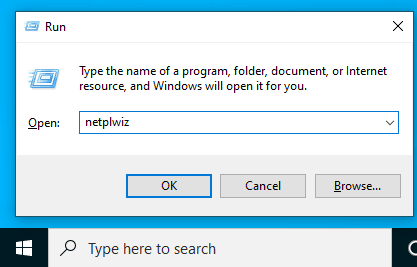
Type “netplwiz” (without quotes) and hit Enter.
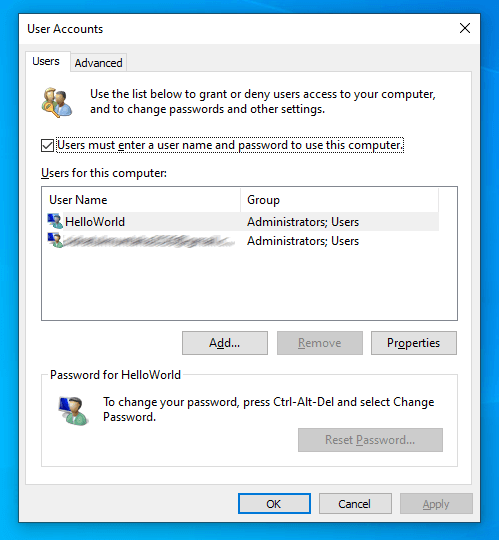
A tool will pop up listing all the user accounts in the system. In this case, we want to remove the Microsoft account. Select the account and click “Remove”.
A warning message will pop up asking for confirmation. Click “Yes” to approve the action.
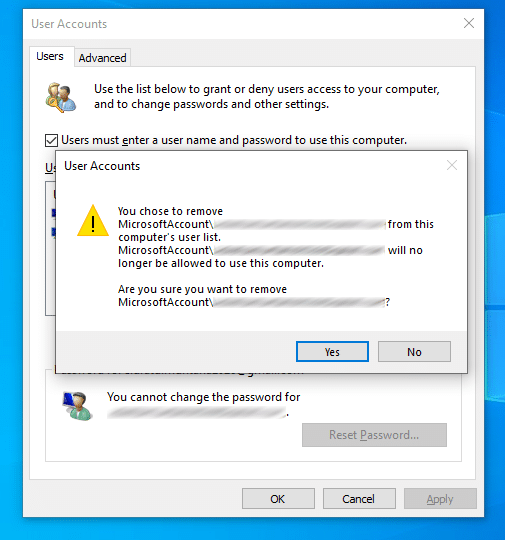
Voila! The Microsoft account is removed successfully! I recommend rebooting the system to take the changes into effect.
Part 2. How to Delete Microsoft Account in Windows 10 without Password
All the methods mentioned before are applicable if you have access to the Microsoft account on your system. What if you lost access to the account? If you’ve lost access to your Microsoft account, you can simply perform a password reset through this link. Even if that’s not available to you, then you’re in a bit of trouble. It’s still possible to remove the Microsoft account from your system. However, you may not keep the user-specific file(s) and folder(s) in such a situation.
In this section, I’ll showcase how to remove Microsoft account from your system even if you don’t have the password of that account without losing data. We’ll be using Windows Password Reset to reset the login password of the Microsoft account. Once the password is reset, you’re free to remove the account (refer to method #1). Let’s get right into how to remove Microsoft account from Windows 10 without password and no data loss.
Free Download Buy Now(Pro)1. Getting Windows Password Reset
Before jumping into the tutorial, there are a few things to take care of. First of all, Windows Password Reset isn’t a free tool. It comes with a price tag. Depending on what feature you want, the price is going to vary. The tool comes in 4 different editions, each with its own price and with its own feature set. Pick a version per your need.
It’s a one-time purchase. Once purchased, you get to use the tool as long as you want. For this example, I’ll be grabbing the trial version of Windows Password Reset Professional edition.
2. Preparing a bootable device
The way this tool works is, you create a bootable media and using the media, you unlock access to the Windows 10 account. It requires installing software first. Grab the installer.
Run the installer. First, the welcome page will pop up. Click “Next”.
Click “I Agree” to agree with the license agreement.
Select the installation location of the tool. Then, click “Install”.
Click “Finish” to complete the installation process.
3. Creating a bootable media
Windows Password Reset offers two types of bootable media: USB flash drive and CD/DVD. Choose one from it.
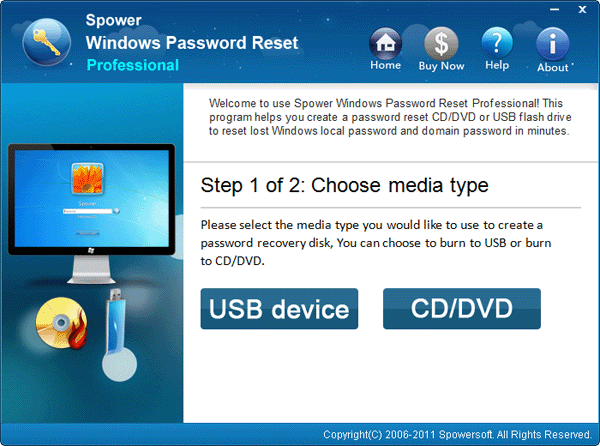
-First, let’s have a look at how to create a bootable USB flash drive.
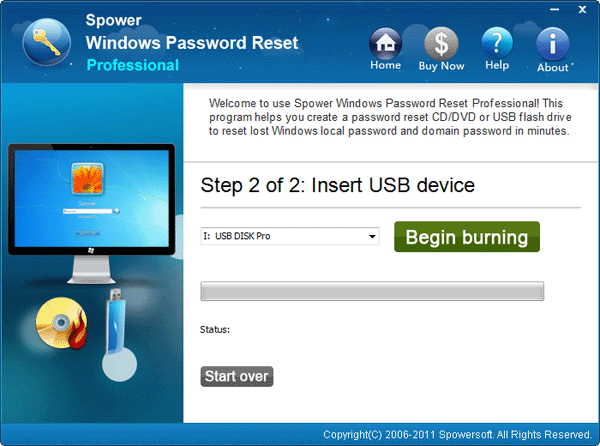
Connect the USB flash drive and launch the tool.
The tool will automatically detect the USB drive. Click the “Begin Burning” button. The process will erase all the data inside the drive, so make sure to take necessary actions beforehand.
When prompted for confirmation, click “Yes”.
Once the creation is complete, a success message will pop up. Click “OK”.

-Now, let’s check out how to create a bootable CD/DVD. First, insert a blank disc in the CD/DVD ROM. Now, fire up the tool. It’ll automatically detect the disc.
Click “Begin Burning”
A confirmation message will pop up. Click “Yes”.
Wait for the process to complete. It may take a while. Once complete, the success message will pop up.
4. Resetting Windows 10 password
Now, we’re ready to reset the login password of the Microsoft account. Connect the bootable media to the computer and press the boot key(try “F12” Or “Esc”, or do you research since it is different from brands) to enter the boot menu. Then choose the bootable media and press Enter.
Now it may take a minute or two to load it up. Once loaded, you’ll directly land on the main screen.
Everything is self-explanatory. First up, select the appropriate operating system. The next part will show all the user accounts present on the system. Select the target Microsoft account and click “Reset”.
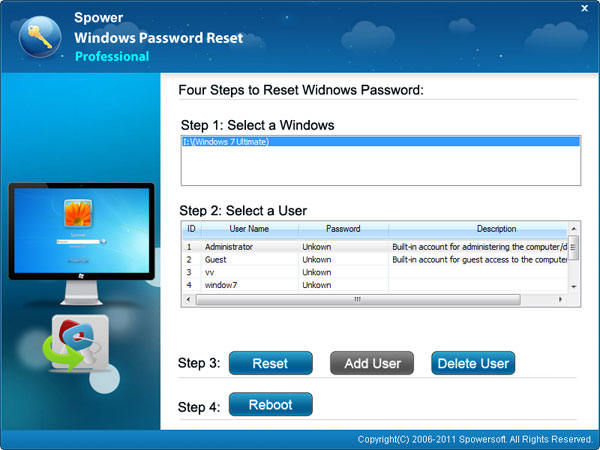
Note: In some situations, the process may not be successful. In that case, you should reset the password of the Administrator account and use it to remove the Microsoft account. If you didn’t know, the Administrator account is the most powerful user account in the Windows ecosystem that has permission to access and perform even the most system-critical places and functions.
When you’re done, click “Reboot”.
Now that you have access to the account, refer to method #1 on removing the Microsoft account.
Final thoughts
There are plenty of ways to remove Microsoft account from Windows 10 and switch to a local account. Depending on your situation, feel free to follow what method you seem fit. If you have access to the account, then simply follow method 1. Otherwise, you have to take the help of 3rd-party tools like Windows Password Reset to perform deleting Microsoft account without password simply.
Enjoy!
Free Download Buy Now(Pro)