How to Change Administrator Account Name on Windows 10
Windows administrator accounts are those that have elevated permissions. Some users might need to change their admin account names on Windows 10. For example, one user said this in a Microsoft forum post, “When I installed Windows 10, it used the computer name as my user account name; how do I change it?”
If you’re wondering how to change administrator account name in Windows 10, like the quoted user, there are various ways you can do it. Note, however, that you’ll need administrative access to rename an admin account in Windows. So, make sure you’re logged in to an admin account. Then you can change admin account names on Windows 10 with the methods below.
- 1. Change Administrator Account Name on Windows 10 from Control Panel
- 2. Change Administrator Account Name on Windows 10 from Local Users and Groups
- 3. Change Administrator Account Name on Windows 10 from Local Group Policy Editor
- 4. Change Administrator Account Name on Windows 10 with Command Prompt
- 5. Change Administrator Account Name on Windows 10 with PowerShell
- How to Change Forgotten Administrator Password on Windows 10?
1. Change Administrator Account Name on Windows 10 from Control Panel
Step 1: First, press the Windows key + X, which will open the menu.
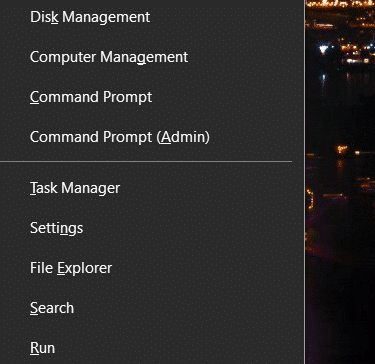
Step 2: Next, select “Run” to open that accessory.
Step 3: Type Control Panel in Run, and press the Enter key.
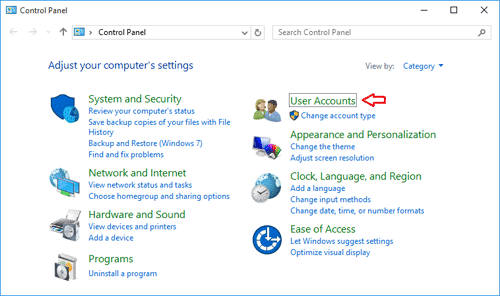
Step 4: Click “User Accounts” in the Control Panel to open the options in the snapshot directly below.
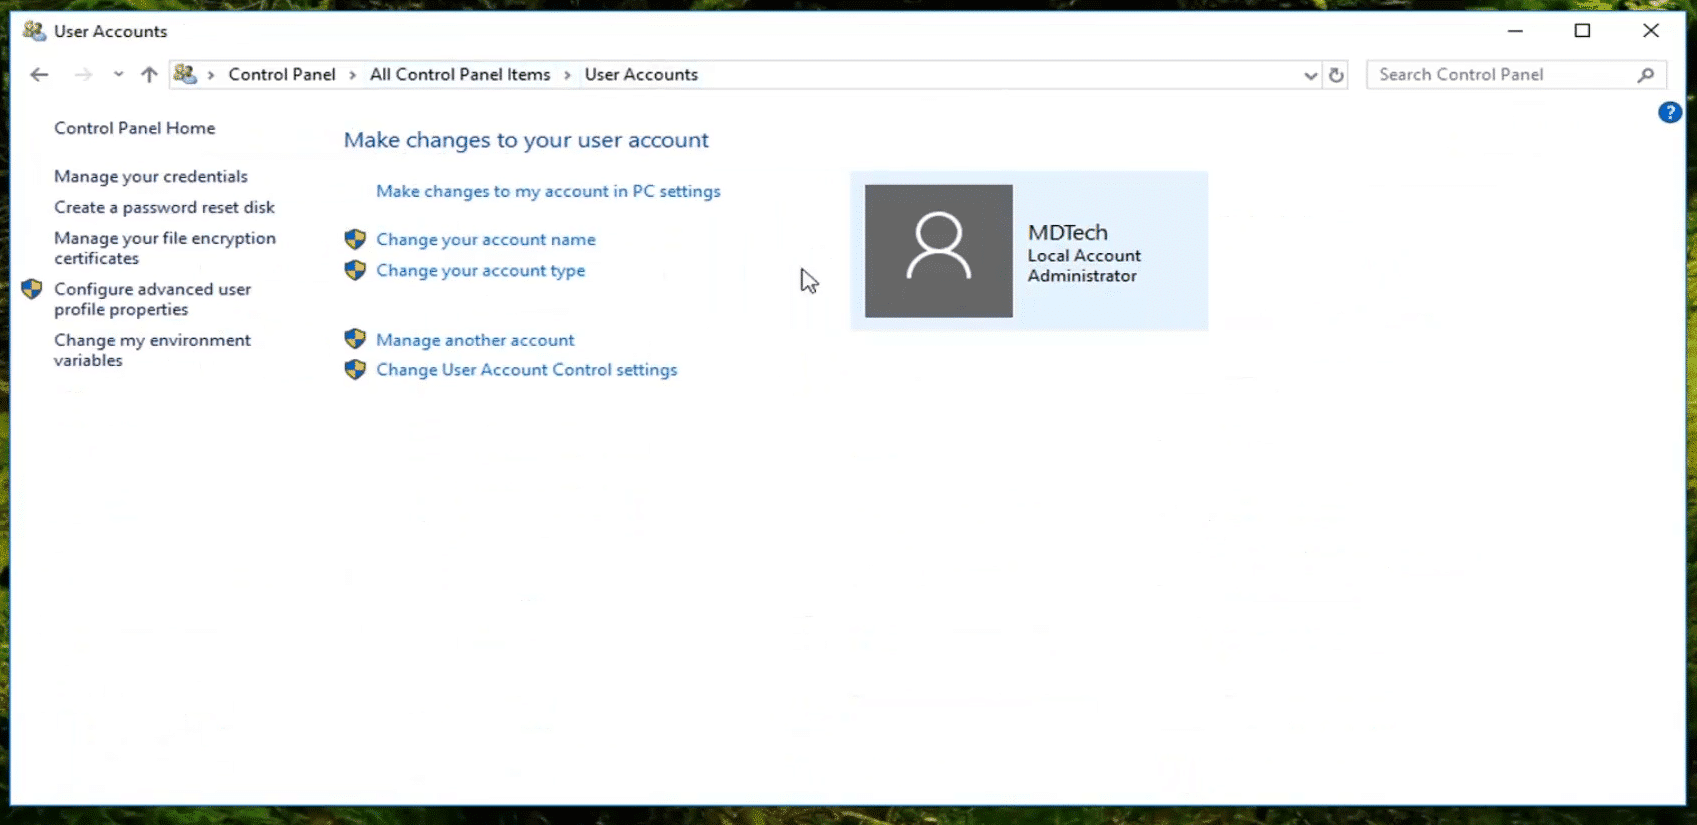
Step 5: Then click the “Change your account name” option.
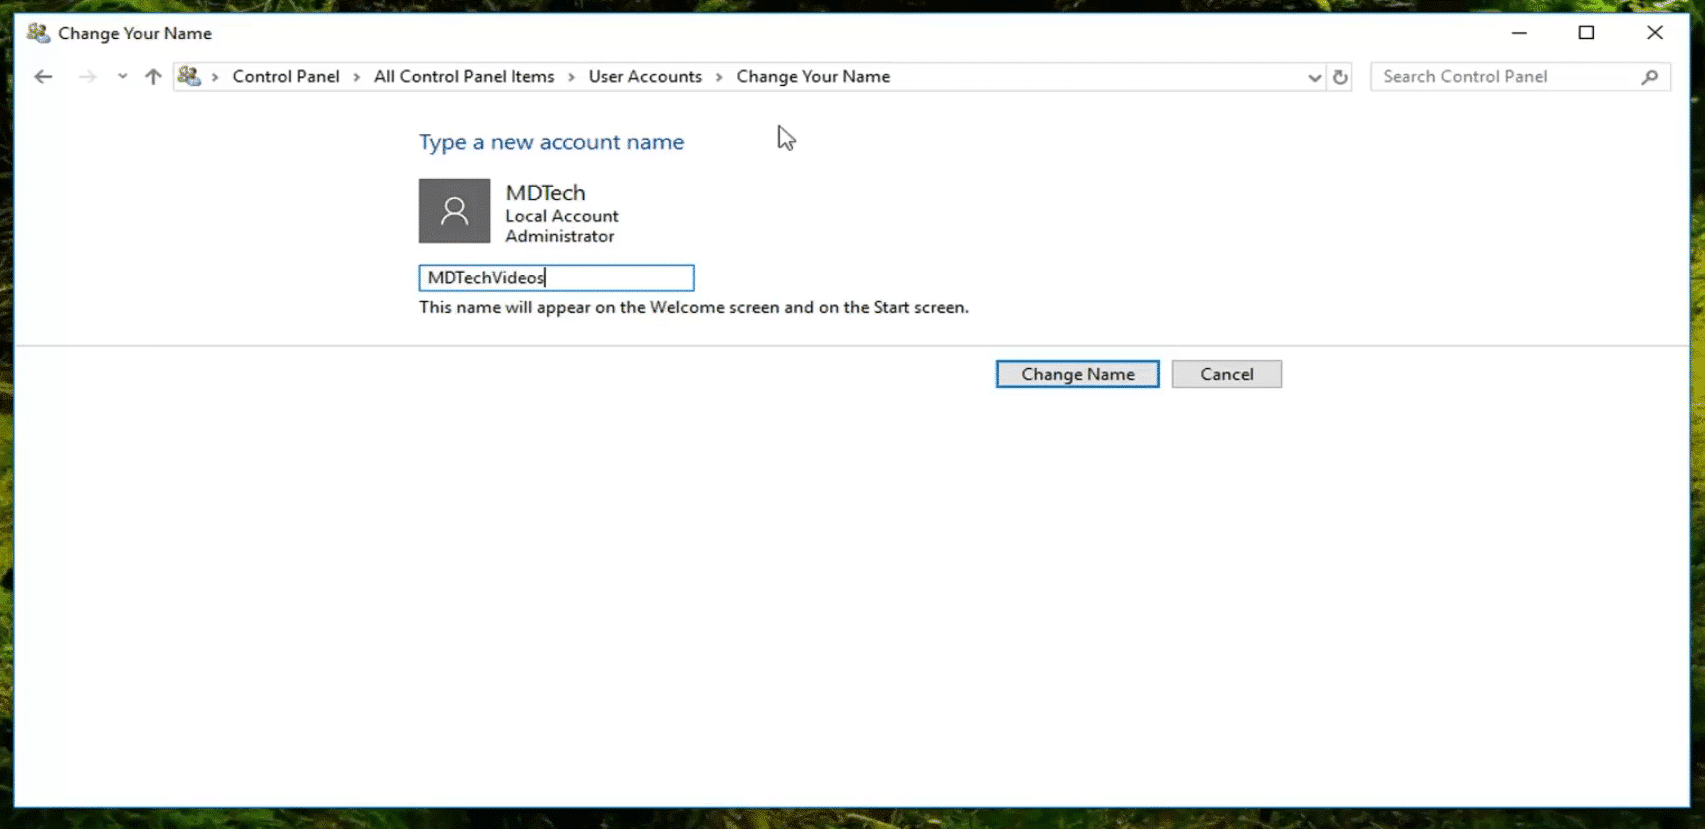
Step 6: Enter an alternative admin account name to change administrator name on Windows 10.
Step 7: Press the “Change Name” button.
If you need to rename an account that isn’t the one you’re logged into, you’ll need to click the “Manage another account name” option. Then select an account to change, and click the “Change account name” option.
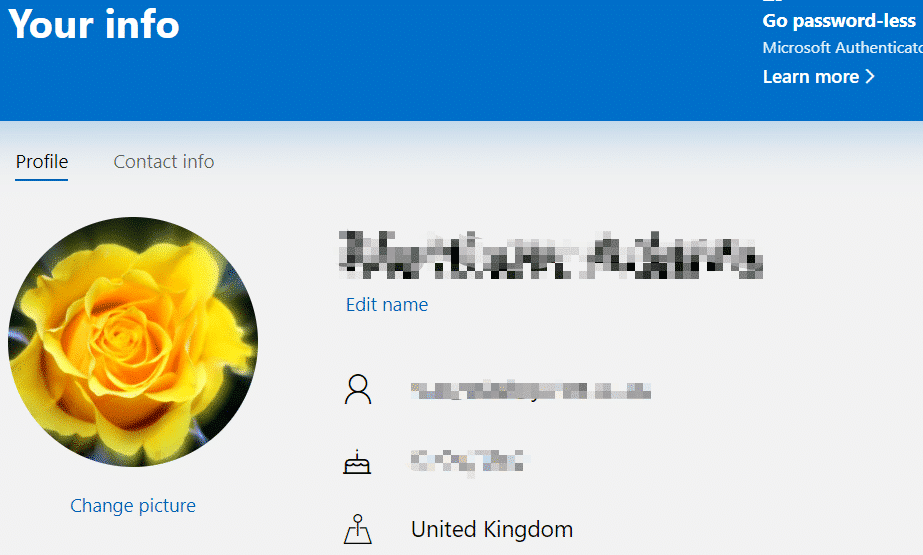
Note that you can’t rename Microsoft user accounts with the “Change your account name” Control Panel option as outlined above. To change the name of a Microsoft admin account you sign in to Windows with, you’ll need to edit the profile for it via the Microsoft account page in a browser. Click “More actions” > “Edit profile” > “Edit name” on the Microsoft account tab for the user account you need to rename.
2. Change Administrator Account Name on Windows 10 from Local Users and Groups
Here is how to change administrator name on Windows 10 Pro and Enterprise editions with the Local Users and Groups utility.
Step 1: First, right-click Windows 10’s Start button and select “Run” on the menu.
Step 2: Input lusrmgr.msc in Run and click “OK” to open the Local Users and Groups window.
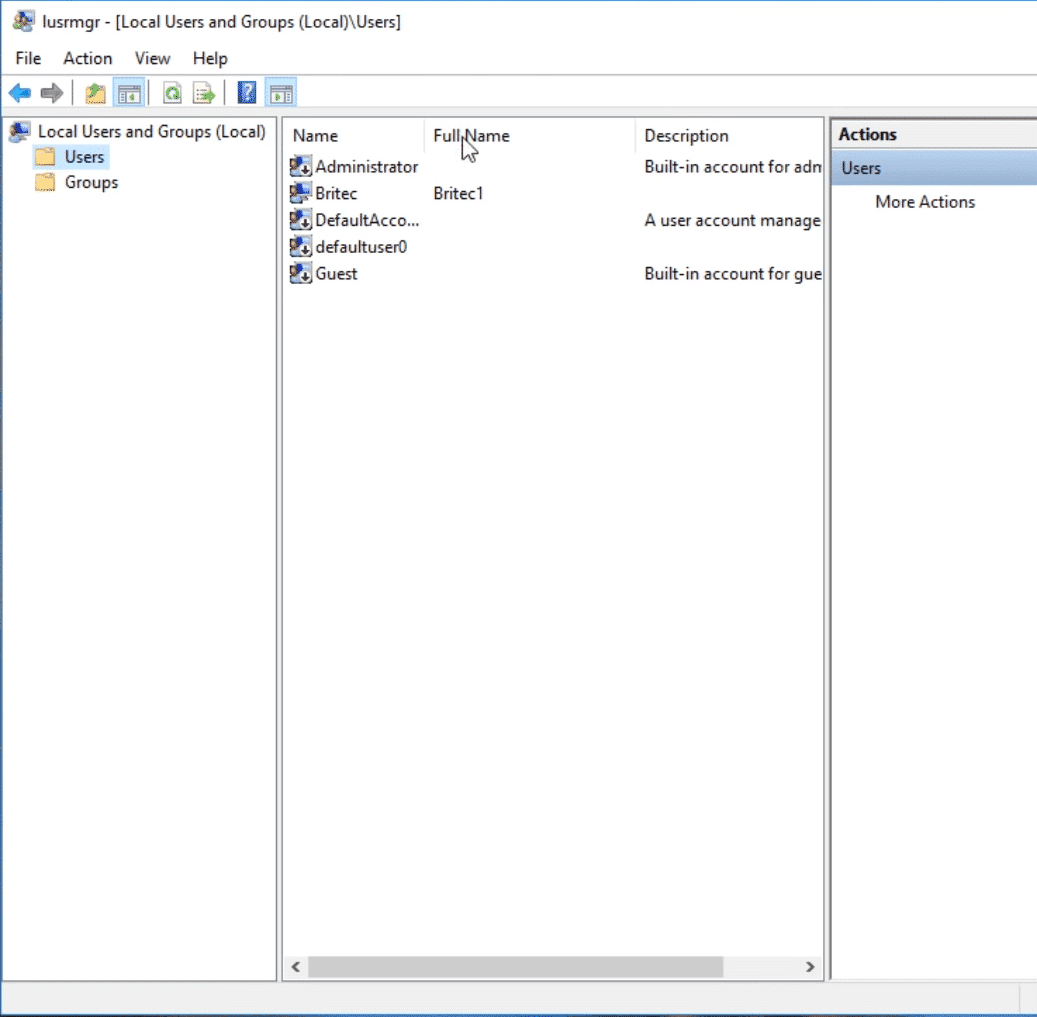
Step 3: Select “Users” on the left of the window.
Step 4: Right-click the admin account you need to rename to open a context menu.
Step 5: Select the “Rename” option.
Step 6: Enter a new title for your admin user account, and press the Enter key.
3. Change Administrator Account Name on Windows 10 from Local Group Policy Editor
Step 1: This is another method more specifically to solve out how to change administrator account name in Windows 10 Pro and Enterprise editions, which include the Local Group Policy Editor. Click Windows 10’s “Type here to search” taskbar button to open that search box.
Step 2: Enter the keyword gpedit.msc in the text box to search for Local Group Policy Editor.
Step 3: Click gpedit.msc to open the Local Group Policy Editor.
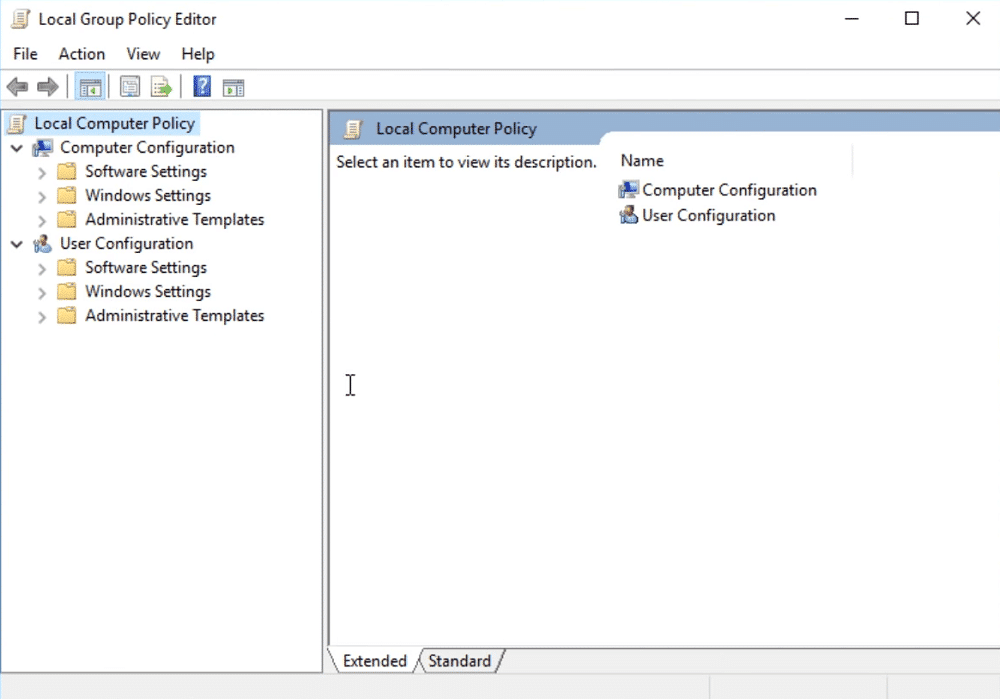
Step 4: Click “Computer Configuration” on the left of the Group Policy Editor window to expand it.
Step 5: Then click “Windows Settings” > “Security Settings” > “Local Policies” to expand them.
Step 6: Select “Security Options” to open the policies shown directly below.
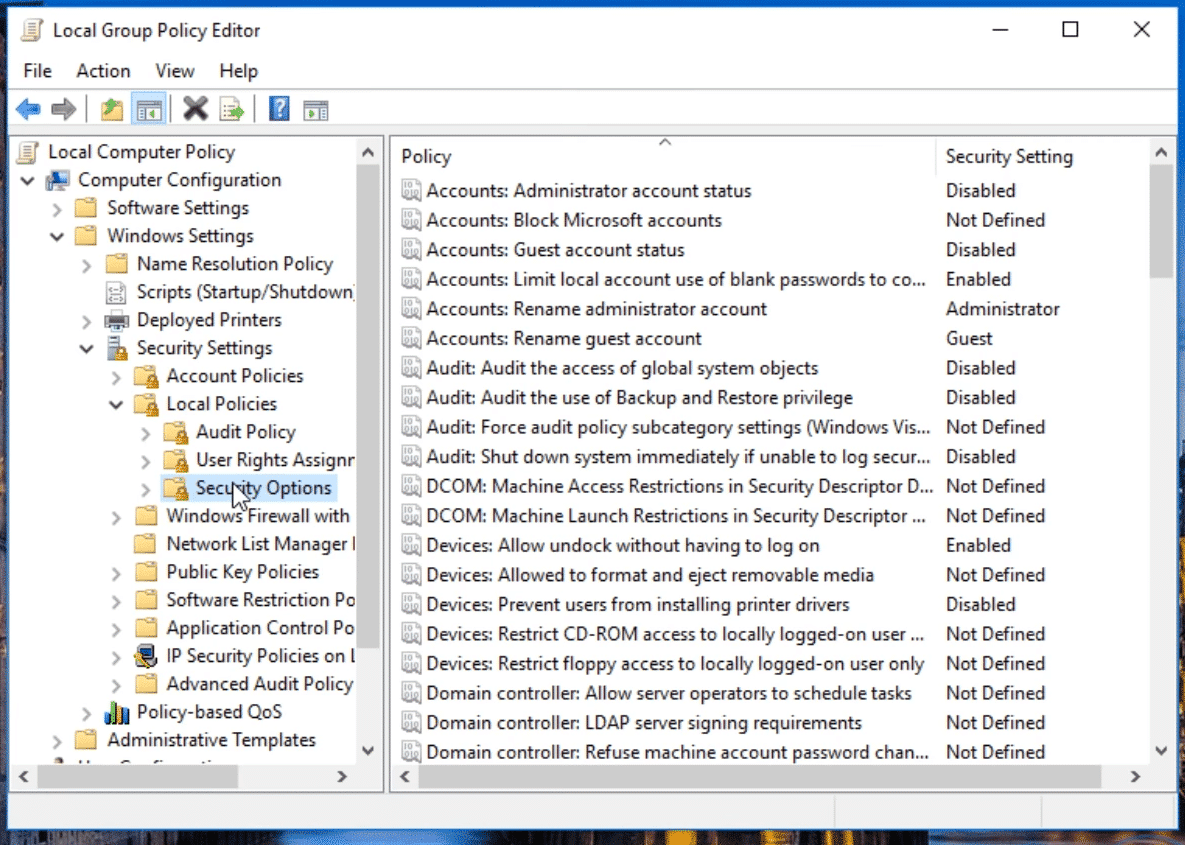
Step 7: Click “Accounts: Rename administrator account” to open the window in the shot directly below.
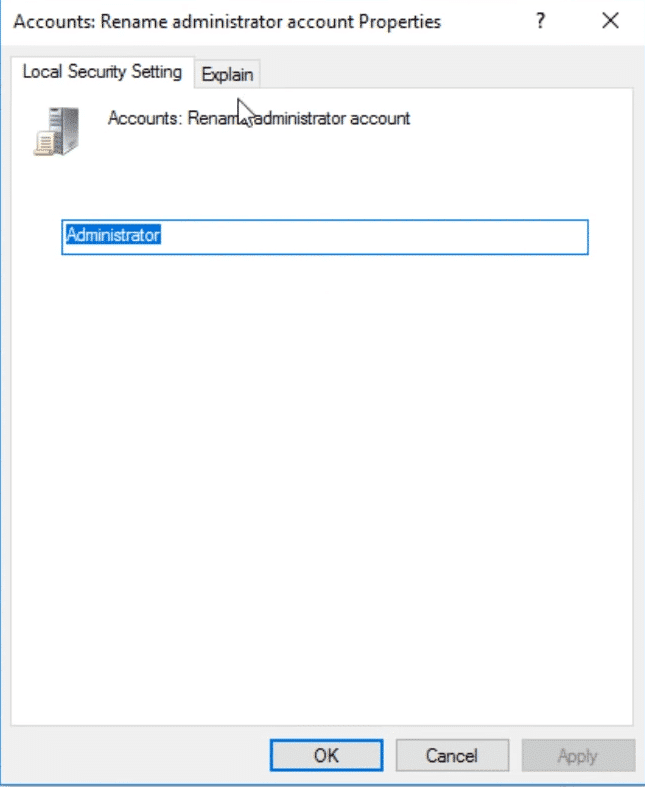
Step 8: Delete the Administrator account title.
Step 9: Then enter a new admin account name in the text box.
Step 10: Remember to click the “Apply” button.
Step 11: Click “OK” to exit the window.
Step 12: Close the Local Group Policy Editor window, and restart your desktop and laptop.
Note that this Group Policy Editor method changes the name for the built-in Windows 10 Administrator account. The built-in Administrator account is one that you can enable with the net user administrator /active:yes Command Prompt command. You can also rename an Administrator account with the Local Users and Groups utility, Command Prompt, and PowerShell.
4. Change Administrator Account Name on Windows 10 with Command Prompt
Step 1: Open Windows 10’s search box by clicking the “Type here to search” taskbar button.
Step 2: Input cmd in the search box to find the Command Prompt.
Step 3: Right-click Command Prompt to select the “Run as administrator” context menu option for it.
Step 4: Then enter wmic useraccount where name=’Administrator’ call rename name=’newAdministratorName‘ into the Prompt’s window. Replace newAdministratorName in that command with a name you prefer for the account.

Step 5: The above command will rename the built-in Administrator account. To change Windows 10 administrator name for another admin account, you’ll need to replace Administrator in the above command with an alternative admin account name.
Step 6: Press the Enter keyboard key to initiate the command.
5. Change Administrator Account Name on Windows 10 with PowerShell
Step 1: PowerShell is an alternative command-line utility to the Command Prompt with which you can also change admin account names on Windows 10. First, you’ll need to press the “Type here to search” button (with the magnifying glass icon) on the taskbar.
Step 2: Type the keyword PowerShell in the text box.
Step 3: Click Windows PowerShell to open that command-line utility.
Step 4: Now type Get-LocalUser in PowerShell, and press the Enter key. That command will display all user accounts on your PC.
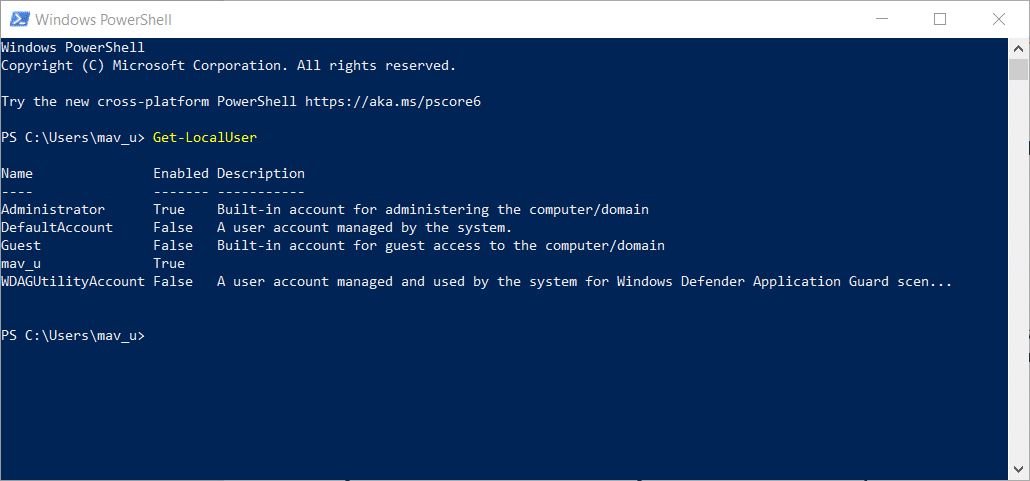
Step 5: To rename an enabled built-in Administrator account, enter this command: Rename-LocalUser -Name Administrator -NewName NewAdminName. You’ll need to replace NewAdminName in that command with a name of preference.
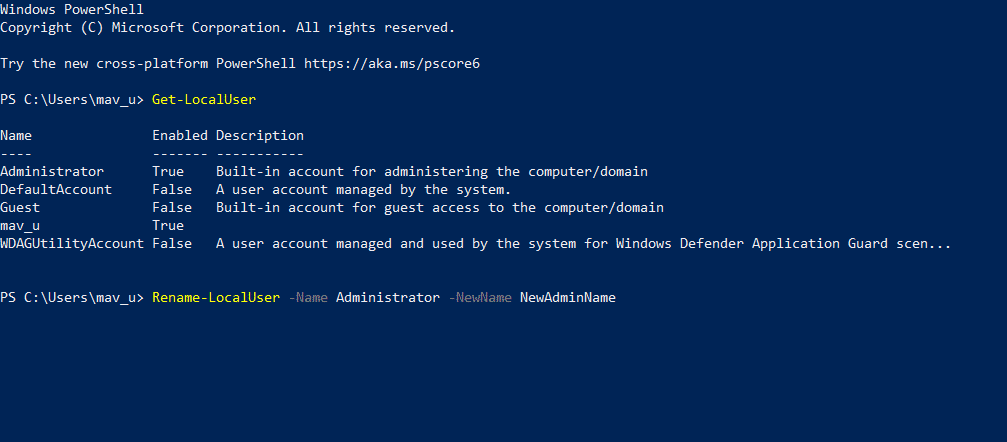
Step 6: If you need to rename an alternative admin account, replace Administrator in the above command with the name of the account you need to change.
Step 7: Press the Enter keyboard key to initiate the command.
How to Change Forgotten Administrator Password on Windows 10?
Changing your admin account name is all well and good, but that won’t help much if you’ve forgotten your administrator account password! If you ever forget your password for your renamed administrator account, check out Windows Password Reset. That’s the best Windows password recovery tool with which you can set up a password reset disk. This is how you can bypass Windows 10 password with that software.
Free Download Buy Now(Pro)Step 1: Log in to Windows 10 on a PC you can still sign in to. Then download Windows Password Reset and install it with its setup wizard.
Step 2: Open the Windows Password Reset software window.
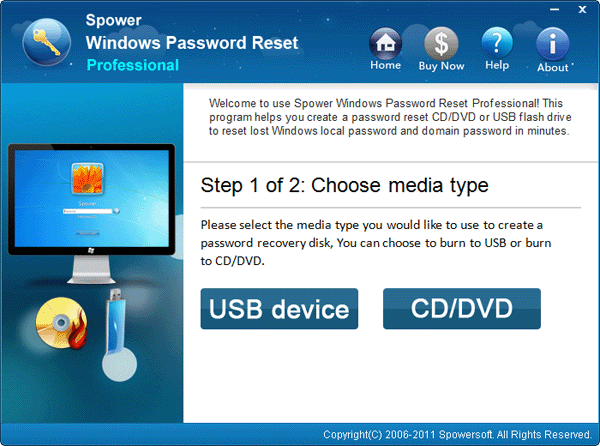
Step 3: Click the “USB device” or “CD/DVD” button depending on what bootable media you’re going to set up the reset disk with.
Step 4: Insert a USB flash drive or DVD to burn the reset disk to.
Step 5: Press the “Begin burning” button.
Step 6: When you’ve set up the reset disk, insert the bootable media into the PC that includes the admin account you’ve forgotten the password for.
Step 7: Turn on the locked PC. The PC will then boot from the reset disk so long as you’ve configured it to boot from it.
Step 8: Select your platform in the “Select a Windows” box.
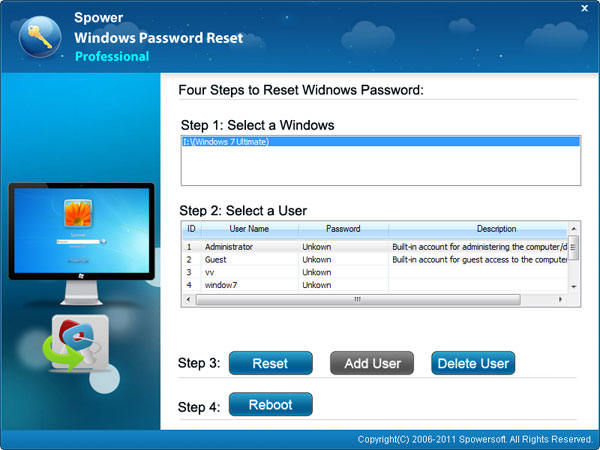
Step 9: Select the admin user account you’ve forgotten the password for. You can also select to reset the password for the built-in Administrator account if needed.
Step 10: Press the “Reset” button. That option will reset the password to a blank one.
Step 11: Click “Yes” on the restart dialog box that opens.
Step 12: Thereafter, you can log in to the admin account with the blank password.
Conclusion
So, that’s how to change administrator account name in Windows 10 and reset the password for an Windows admin or local account. Now you can rename your admin account to something more preferable. Windows Password Reset might also come in handy if you ever forget the password for your administrator account.
Free Download Buy Now(Pro)