How to Disable Windows Hello Pin
Windows 10 comes with several fantastic login features including PIN, password, fingerprint, and Face ID access. The various login options make it easier for you to choose a convenient option.
Out of the options available, Windows Hello PIN might look simple, but the challenge is that it is also easy to forget. Here, we explain how to disable Windows Hello PIN using different methods.
- What is Windows Hello PIN?
- How to Disable Windows Hello Pin from Settings
- How to Disable Windows Hello Pin from Registry Editor
- Bonus: How to Get into A Locked Windows with Windows Password Reset
What is Windows Hello PIN?
The Windows Hello PIN is just one part of Microsoft’s biometric security system which includes facial recognition, fingerprint and iris scan. However, before users can gain access to the other biometric features, Windows Hello PIN must be set up first. This alternative way for users to login to their PCs was introduced in 2015.
Unlike the normal passcode, the Windows Hello PIN is linked to the device on which it is set up. As a result, you cannot use the same code for a different computer with the same Microsoft Account. Each Microsoft account must have a unique Hello PIN. So, even if the Hello PIN gets stolen, your account cannot be accessed unless your PC gets stolen as well.
The PIN is available for Windows 10 PCs and can comprise of a set of figures and/or letters. There are specific requirements this pin must satisfy; they include:
Number of Characters
The minimum number of characters for the Windows Hello PIN is four. However, you can update minimum number of PIN characters for the Windows Hello PIN by using Local Group Policy Editor or Registry Editor both on Windows.
Combination of Characters
The Windows Hello PIN can solely comprise of numbers or users can opt to include letters and symbols by enabling the permission. The Windows Hello PIN can also comprise of lowercase and uppercase letters. However, users cannot have sequences of numbers/letters or multiples of a single number/letter.
Duration of PIN
For non-business or non-enterprise users, the Windows Hello PIN lasts for as long as the user wants and can be changed anytime. However, for business and enterprise users, the Windows Hello PIN must be changed every 180 days or according to internal policy.
PIN Changes
When making changes to the Windows Hello PIN, users cannot make use of the previous PINs. The new PIN must be unique.
Now, that’s out of the way, let’s discuss how to remove Windows hello pin.
How to Disable Windows Hello Pin from Settings
As you begin to set up a new Windows computer, you will be required to provide a user account. You will need to provide a PIN along with your regular password. If you fall into the category of people that would instead work without a pin, this section is for you. You can disable the hello pin and use another authentication method instead. For this section, we explain how to disable Windows Hello PIN from settings.
Step 1: Open “Settings” on your computer.
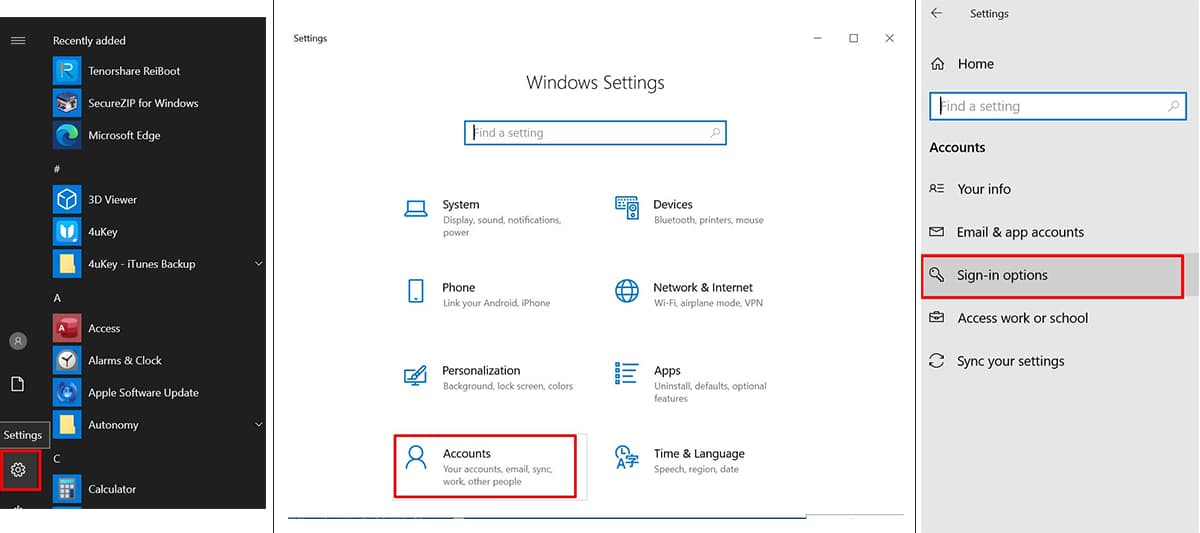
Step 2: Click “Accounts” to see several options available.
Step 3: Click “Sign-in options.”
Step 4: Scroll till you see the “Windows Hello” option.
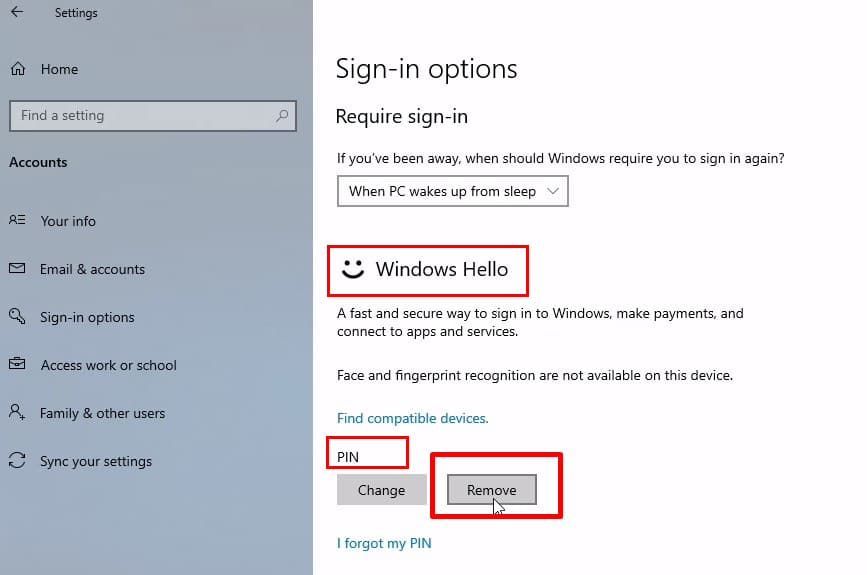
Step 5: You will see the “PIN” title beneath “Windows Hello.”
Step 6: Beneath “PIN” is “Change” and “Remove”. Click on “Remove.” For some users, you may have to click on “PIN” before you can see the two options.
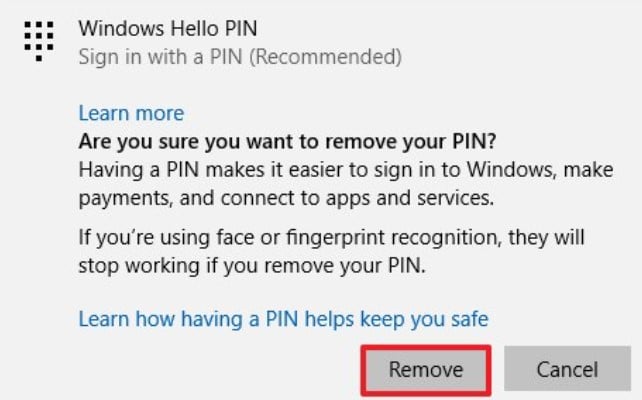
Step 7: This presents you with a confirmation message asking if you want to remove your pin. If you’re going ahead with the removal, then click “Remove” a second time.
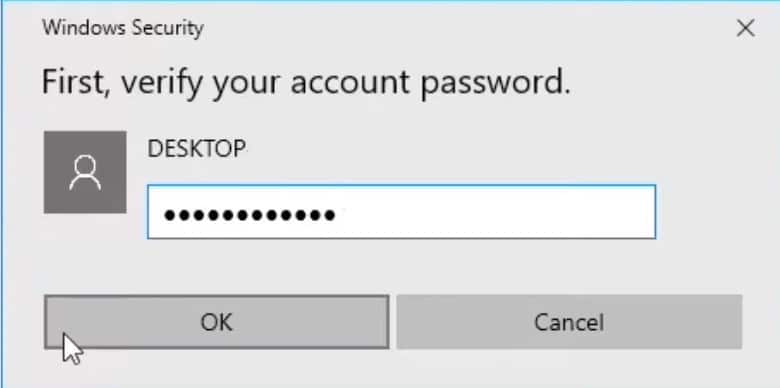
Step 8: In this final step, you need to provide your current password to complete the process. After entering the password, click “OK” to complete the process.
You should note that removing your Windows Hello PIN also means that you cannot use fingerprint or face recognition. Both features work with the hello pin.
How to Disable Windows Hello Pin from Registry Editor
If you don’t feel like trying the method above or it doesn’t work for you, then you can try this method. However, you will need to configure some critical values with the registry to disable Windows Hello PIN.
It is of essence to note that since the method involves going through the registry, a lot of caution is necessary. Any incorrect settings can lead to you losing your entire operating system. We suggest that you run a registry backup before this procedure to mitigate data loss.
Now that you know this check out the steps below to understand the process.
Step 1: Launch your Search menu by using the shortcut Windows Key + S.
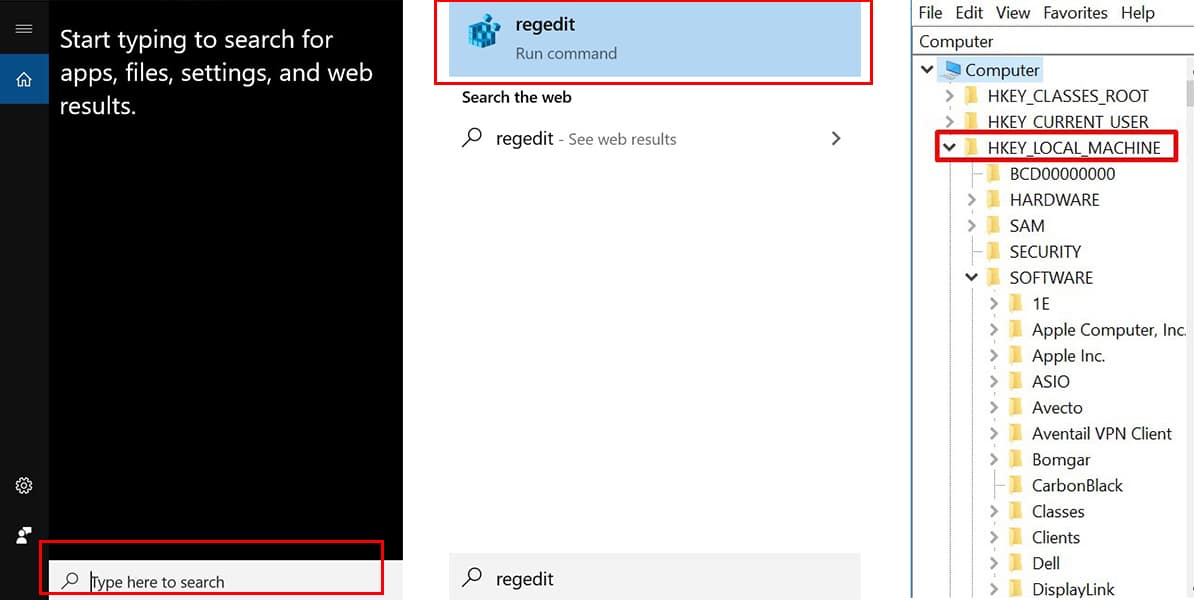
Step 2: Enter “Regedit” in the search bar that pops up and click on the first result “Registry Editor.”
Step 3: Wait for the registry window to pop up.
Step 4: Now, browse to this path:
HKEY_LOCAL_MACHINE\SOFTWARE\Microsoft\PolicyManager\default\Settings\AllowSignInOptions
Step 5: Switch to the right side and then double-click on the “Value” key.
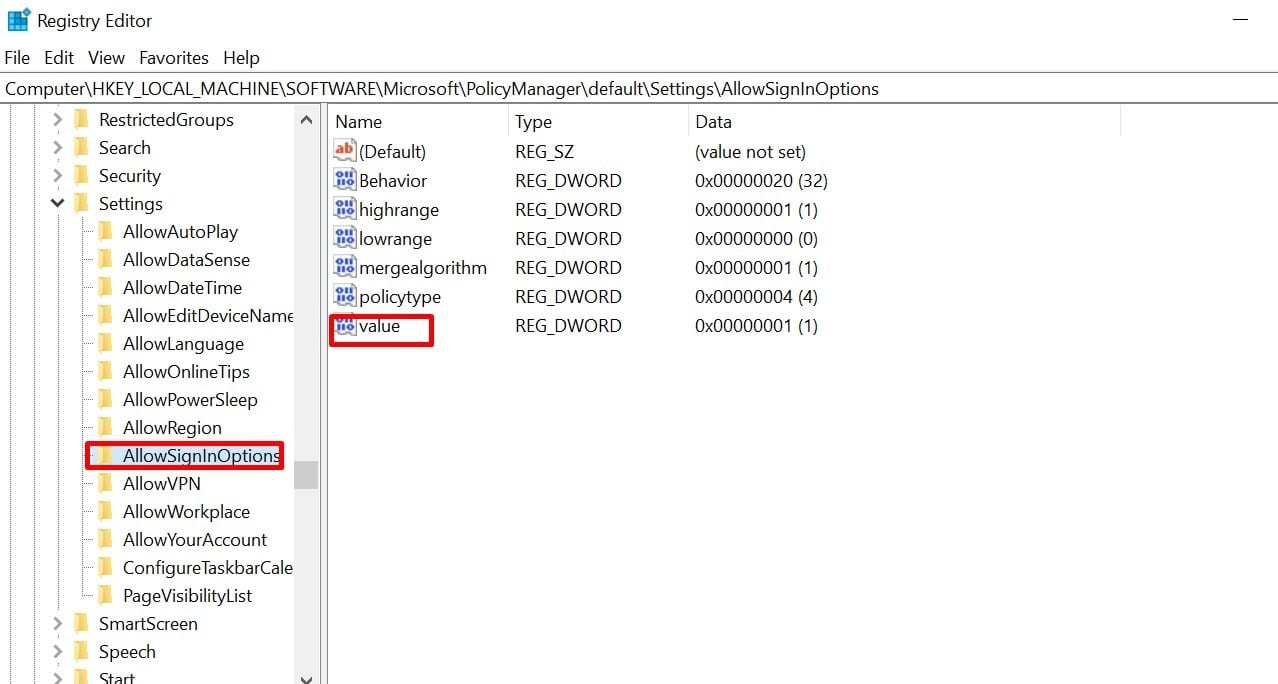
Step 6: Alter the value to “0” from “1”. Doing this disables the Windows Hello PIN.
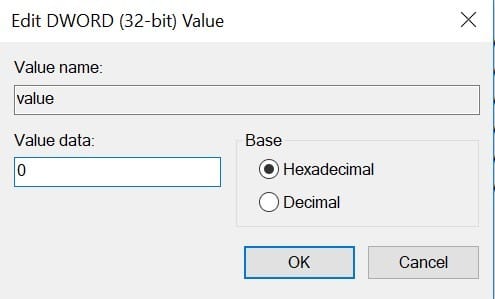
Step 7: Make sure that you click “OK” when you finish so your changes get saved. When next you log in, there will be no need to provide the hello pin.
You can always return here to enable the hello pin. All you should do is repeat the above steps and switch to “1” from “0.”
Bonus: How to Get into A Locked Windows with Windows Password Reset
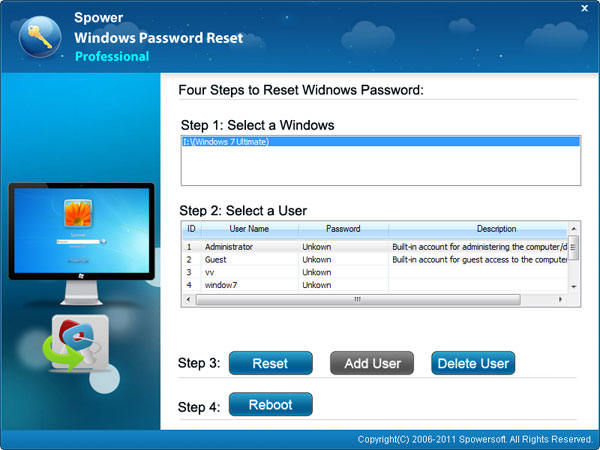
Disabling the Windows Hello PIN requires having access to the User Settings. However, what happens when you can’t even remember your Windows Password to access your system settings? You can make use of Windows Password Reset Tool.
Free Download Buy Now(Pro)The tool helps hack Windows 10 password and below PCs regardless of whether it is a local or administrator account.
Conclusion
Using any of the methods above should disable Windows Hello PIN. However, the complexity of removing the Windows Hello PIN becomes more challenging as you go through each technique. If you have queries on the methods above, please leave a comment below.
Related posts
Recent Posts
- How to Turn Off Samsung Tablet without Password
- How to Make A Password Reset Disk for Another Computer
- How to Reset Password on Sony Vaio Laptop Windows 7/8/10
- How to Print A Secured PDF without Password
- How to Remove Read-Only from Excel
- How to Hack or Crack Password Protected PDF File
- How to Fix Windows 10’s Defaultuser0 Password Issue
- How to Disable Windows Hello Pin
- How to Make A Word Document Read Only
Related Posts
- How to Fix Windows 10’s Defaultuser0 Password Issue
- How to Change Administrator Account Name on Windows 10
- How to Create A New User on Windows 10 without Logging In
- How to Change Lock Screen Password on Windows 10
- How to Remove Microsoft Account from Windows 10 with/without Password
- How to Reset Windows 10 Administrator Password Using Command Prompt
- Windows 10 Login without Password, How to Do?
- How to Break into Windows 10 Admin Account without Password
- How to Crack Windows 10 Password without Resetting