How to Remove Read-Only from Excel
The Microsoft Excel spreadsheet application includes a Read-Only feature for its documents. That feature enables Excel users to share non-editable read-only documents with other users. It’s supposed to be a safeguard that stops other users from making changes to documents shared with them.
If somebody shares a read-only Excel spreadsheet with you, that usually means the other user doesn’t expect you to change it in any way. Yet, you might still spot something that needs changing in a read-only document. Receiving a read-only document doesn’t necessarily mean you’re forbidden from changing it, and there are a few ways you can remove non-editable restrictions from Excel spreadsheets when required. This is how to remove read-only from Excel spreadsheets so you can edit them.
- Case 1: Excel File is Made to Read Only by Marked as Final
- Case 2: Remove Read Only for Read-Only Recommended Excel Files
- Case 3: Excel File Restricted with Editing Password
- Case 4. Excel Worksheet and Workbook Structure is Locked and Read Only
- Bonus Tip: Remove Read Only from Excel without Password
Case 1: Excel File is Made to Read Only by Marked as Final
Sometimes an author might mark a spreadsheet as final. When you open a spreadsheet marked as final, a message will pop up at the top of the document that says, “An author has marked this workbook as final to discourage editing.” In which case, editing is discouraged but not forbidden.

So, it’s very easy to remove read-only restrictions from spreadsheets marked as final. Click the “Edit Anyway” button on the right side of the “Marked as Final” message. Then you can decrypt excel file and edit the document as required. However, don’t change it too much as editing has been discouraged.
Case 2: Remove Read Only for Read-Only Recommended Excel Files
Some users might apply editing restrictions to Excel files with the “Read-only recommended” setting on the General Options window. With that option selected, the spreadsheet will open with a read-only prompt that says: “The author would like you to open this as read-only unless you need to make changes. Open as read-only?”
Then you can select three alternative options on the prompt window. Clicking “Yes” on the prompt will open the spreadsheet as a read-only document. However, you can still disable the “Read-only recommended” feature for Excel spreadsheets. This is how to turn off read only in Excel dialog box prompts.
Step 1: First, open the read-only spreadsheet in Excel.
Step 2: Click the “No” button the prompt that pops up to open the read-only spreadsheet.
Step 3: Next, click the File tab in Excel.
Step 4: Select the “Save As” option.
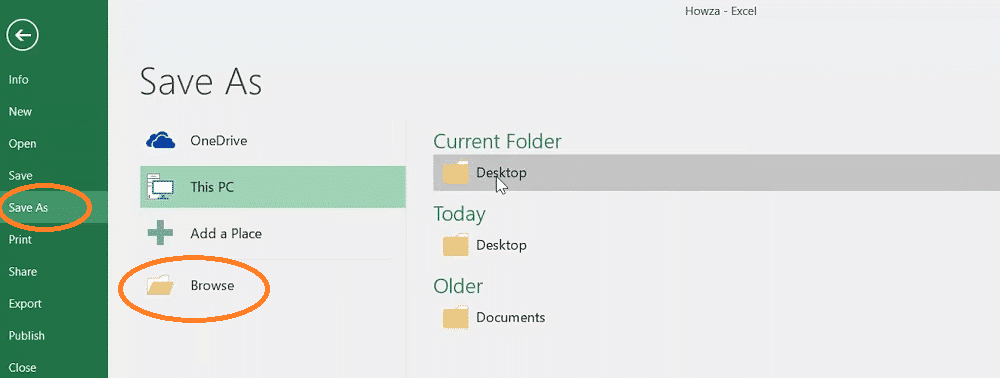
Step 5: Click “Browse” to open the window shown directly below.
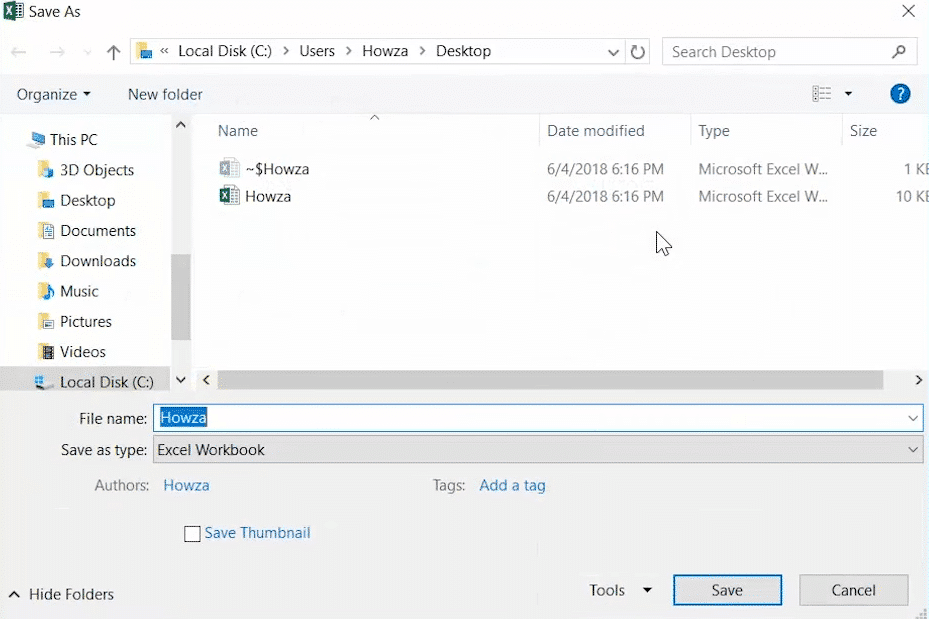
Step 6: Click the small arrow on the “Tools” button to expand its menu.
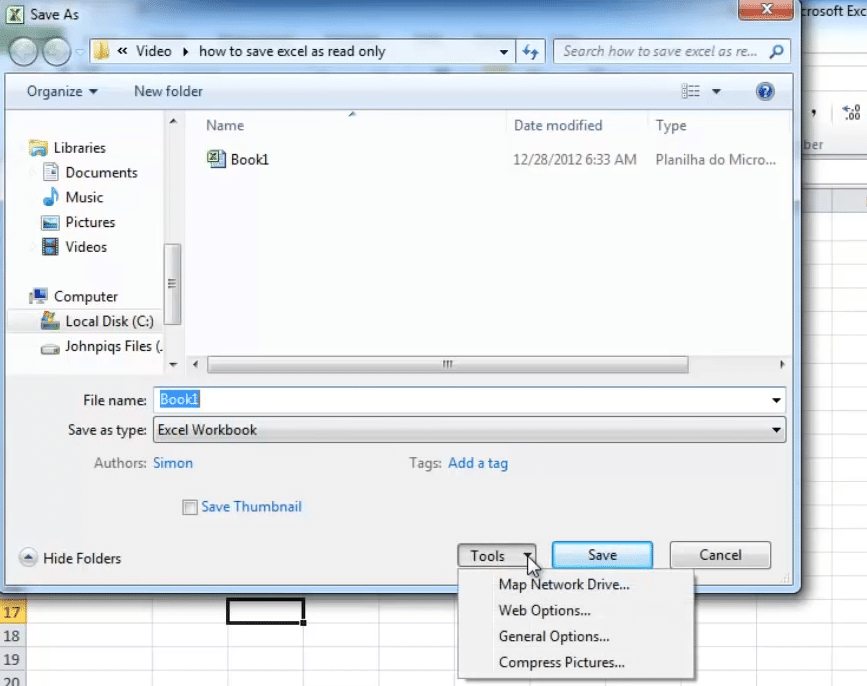
Step 7: Select “General Options” to open the window shown directly below.
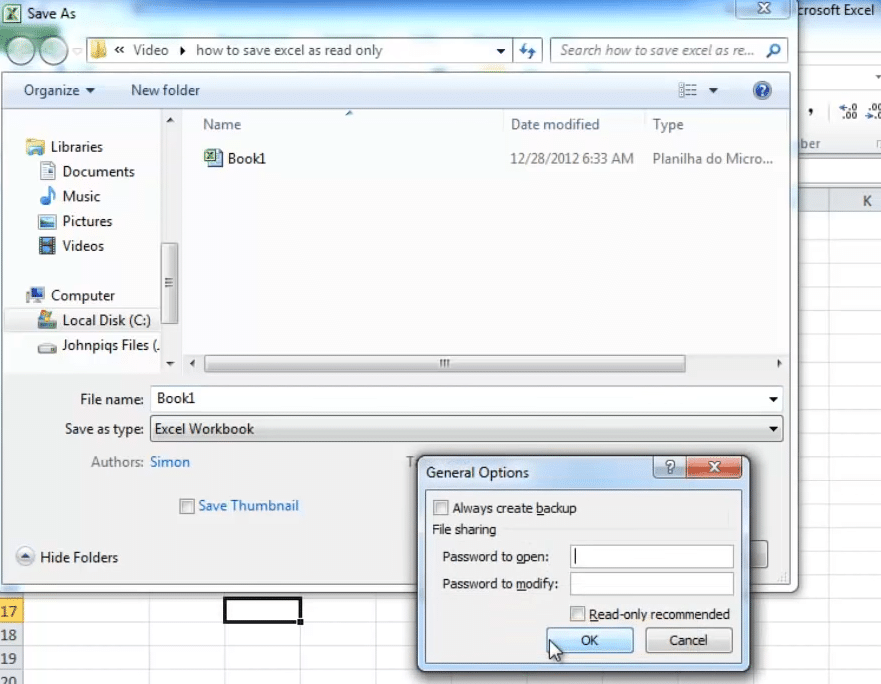
Step 8: Deselect the “Read-only recommended” checkbox.
Step 9: Press the “OK” button.
Step 10: Then click “Save” to save the document.
Thereafter, restart the Excel application to unlock excel file. Then open the Excel document you disabled the Read-only recommended feature for. The spreadsheet will open as any editable one without any dialog box prompt.
Case 3: Excel File Restricted with Editing Password
Sometimes you might be greeted with a Password window when you open a read-only Excel file. When that password box opens, you can click a Read-Only option to open a non-editable spreadsheet. However, a password is required to open the document with write access. This is how to unlock Excel files from read only that have passwords.
Step 1: Open the Excel spreadsheet that’s restricted with an editing password.
Step 2: Click the “Read Only” button on the prompt’s window.
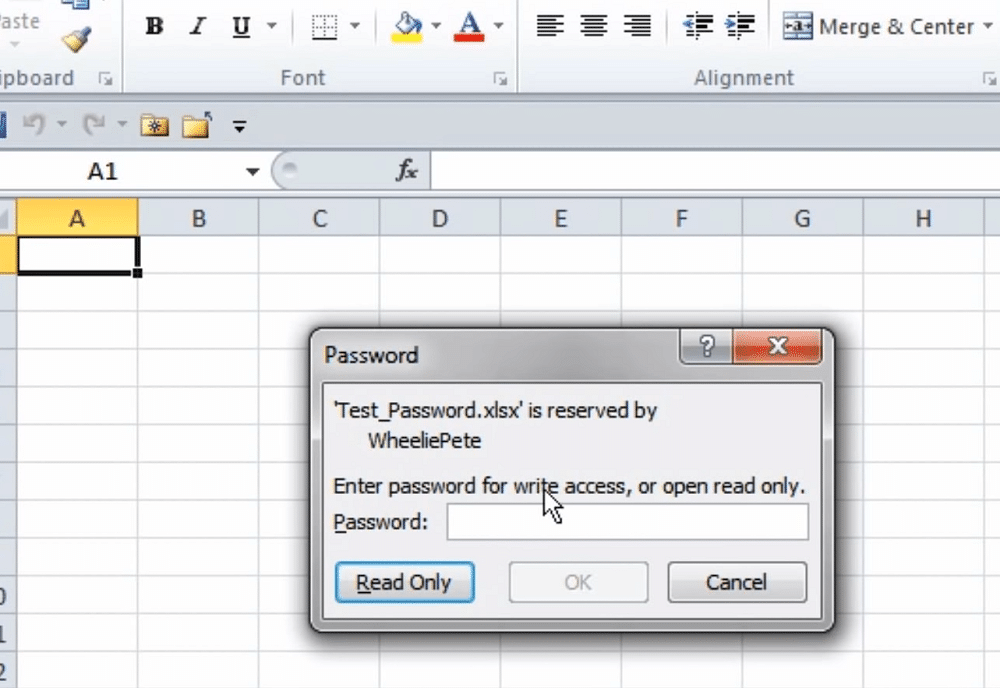
Step 3: Next, click the File tab in Excel.
Step 4: Select the “Save as” option.
Step 5: Enter a new title for the spreadsheet in the File name box.
Step 6: Press the “Save” option.
Step 7: Thereafter, open the newly saved copy of the Excel spreadsheet, which you can edit.
Case 4. Excel Worksheet and Workbook Structure is Locked and Read Only
Some users might lock Excel spreadsheets with the “Protect Sheet” (or worksheet) option. Users can’t edit the spreadsheets that are locked with the “Protect Sheet” option. If you know what the password is for the protected sheet, you can unlock it as follows.
Step 1: Open the protected Excel spreadsheet.
Step 2: Select the Review tab shown directly below.
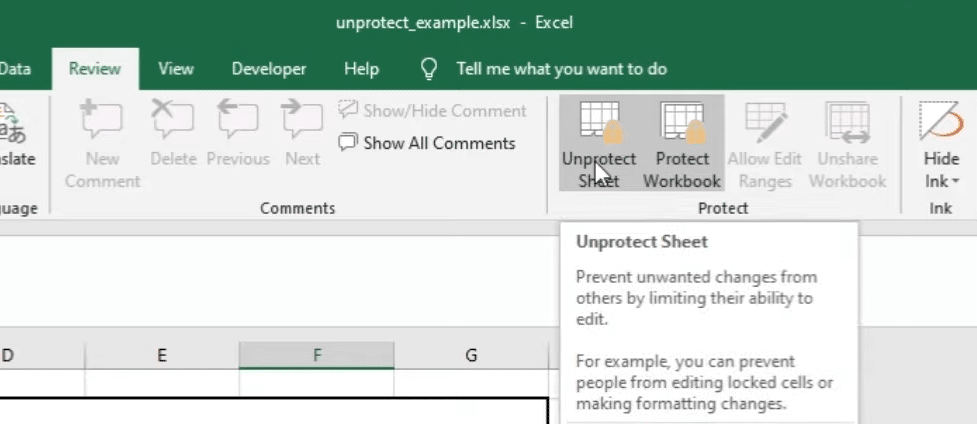
Step 3: Click the “Unprotect Sheet” option to open a password box. If the full workbook is protected, you’ll need to press the “Unprotect Workbook” button.
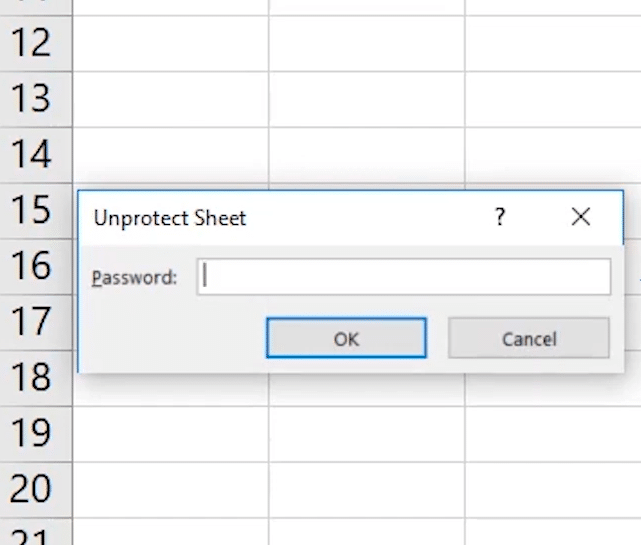
Step 4: Type in the password for the protected spreadsheet.
Step 5: Click the “OK” option.
Step 6: Select the File tab.
Step 7: Click the “Save” option to save the spreadsheet.
Bonus Tip: Remove Read Only from Excel without Password
If you’ve forgotten your password for a protected Excel spreadsheet, however, Passper for Excel will come in handy. With this best Excel password recovery software, you can remove various kinds of read-only restrictions applied to Excel documents. Alternatively, you can recover forgotten passwords for Excel spreadsheets with Passper for Excel.
Passper for Excel is compatible with Windows platforms dating back to XP. You can snap up that software for $49.95. Or you can fully utilize Passper for Excel for one month or a year with its $19.95 and $29.95 monthly and annual plans. When you’ve installed that software, follow the steps below to turn off read only in Excel.
Free TrialStep 1: Open the Passper for Excel window.
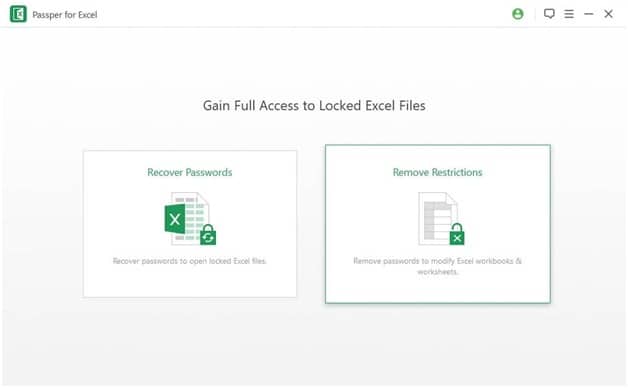
Step 2: Select the “Remove Restrictions” option.
Step 3: Click “Select a File” to select a file you need to remove restrictions for.
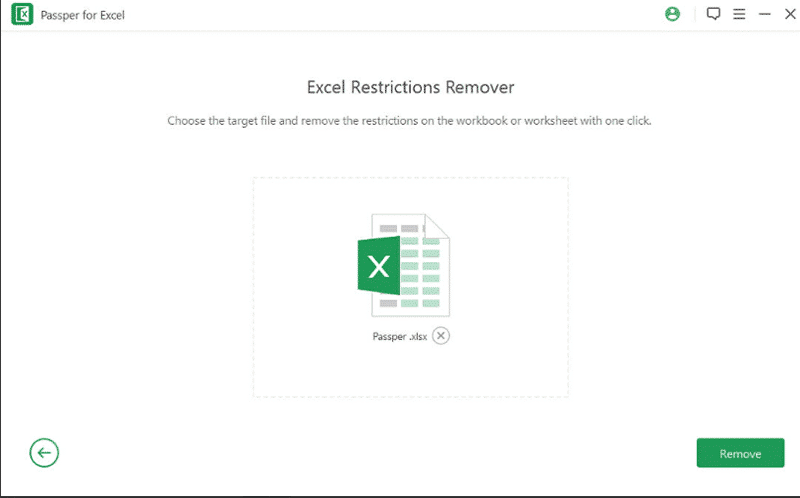
Step 4: Then press the “Remove” button.
Step 5: Click the “Back to Home” button.
Step 6: Thereafter, open the spreadsheet you removed the restrictions for.
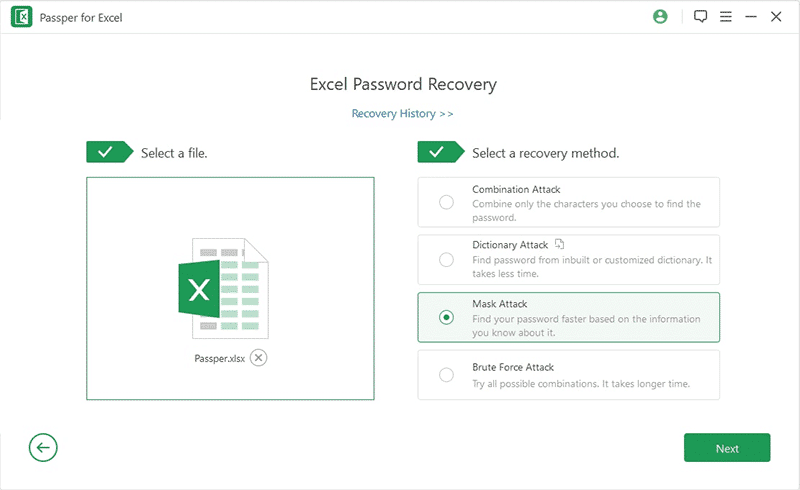
To recover passwords for read-only spreadsheets, you can select the “Recover Passwords” option. When you’ve selected a spreadsheet file to crack, Passper for Excel will present four recovery method options for you to choose from. Select the “Brute Force Attack” option, which is the most comprehensive recovery method.
Conclusion
You may or may not be able to remove read-only restrictions from Excel spreadsheets without needing passwords for them. Much depends on how the author applied the read-only mode. If you can’t remove the most full-proof read-only restrictions from Excel files with the four case methods above, Passper for Excel is your best bet. You can almost certainly remove read only from excel spreadsheets with that software.
Free TrialRelated posts
Recent Posts
- How to Turn Off Samsung Tablet without Password
- How to Make A Password Reset Disk for Another Computer
- How to Reset Password on Sony Vaio Laptop Windows 7/8/10
- How to Print A Secured PDF without Password
- How to Remove Read-Only from Excel
- How to Hack or Crack Password Protected PDF File
- How to Fix Windows 10’s Defaultuser0 Password Issue
- How to Disable Windows Hello Pin
- How to Make A Word Document Read Only
Related Posts
- How to Unprotect Excel Sheet without Password 2013
- Best Microsoft Excel Password Remover Software
- Best Excel Sheet Password Breaker
- How to Unprotect Excel Sheet 2010 without Password
- Microsoft Excel Won’t Open At All? Here Is The Real Fix!
- How to Make an Excel Document Read Only
- How to Unprotect Excel 2016 Without Password
- How to Remove Password from Excel 2018/2016/2013/2010/2007
- How to Bypass or Hack Excel File Password