How To Unlock A Disabled iPhone 12/11/X/8/7/6/5S Without iTunes
Digital devices like iPhones are designed in a way that gives the ability to the user to create a unique lock over the usage section. It is most commonly known as screen lock and the security applied is password protection. Being in human nature, anyone can forget the password and face a situation when the device says wrong password and finally the mobile gets disabled. The conventional method to re-enable it is by implying iTunes or iCloud, but here in this article, you can check out how to unlock disabled iPhone 12/11/X/8/7/9/5S without iTunes or iCloud.
Here is the best method of iPhone disabled fix without iTunes.
- Method 1. Best Way To Unlock A Disabled iPhone Without iTunes Or iCloud
- Method 2. Unlock A Disabled iPhone Without iTunes By Using iCloud
- Method 3. Unlock A Disabled iPhone Without iTunes By Using Siri (iOS 8.0 – iOS 11)
- Extra Tips: Unlock Disabled iPhone With iTunes
Method 1. Best Way To Unlock A Disabled iPhone Without iTunes Or iCloud
While searching for ways to unlock a disabled iPhone without iTunes, you might have come across some websites claiming to do the same. Here is a specialized software, iMyFone LockWiper, to unlock a disabled iPhone without iTunes.
iMyFone LockWiper can unlock Apple ID without password, bypass restriction passcode, or remove iPhone passcode to unlock a disabled iPhone without iTunes or iCloud. The tool is highly effective, efficient, secure, and valuable for money in terms of its working capacity. Almost any of the latest and old disabled Apple devices can be unlocked using the iMyFone LockWiper.
Free TrialKey Features of iMyFone LockWiper
- It can be installed on Windows 10/8.1/8/7 and Mac 10.9/10.15.
- It can remove any passcode from 4/6 digits to Touch/Face ID.
- It can remove iPhone passcode, unlock Apple ID, and bypass screen time.
- It is compatible with all the iPhones from 3G to 12, iPod Touch from 1 to 6, and all models of iPads.
How to use iMyFone LockWiper for iPhone Disabled Fix Without iTunes
Read the following steps to unlock a disabled iPhone using iMyFone LockWiper.
Step 1. Click on the iMyFone LockWiper icon to launch the software, and connect the disabled iPhone to the computer using the USB cable.
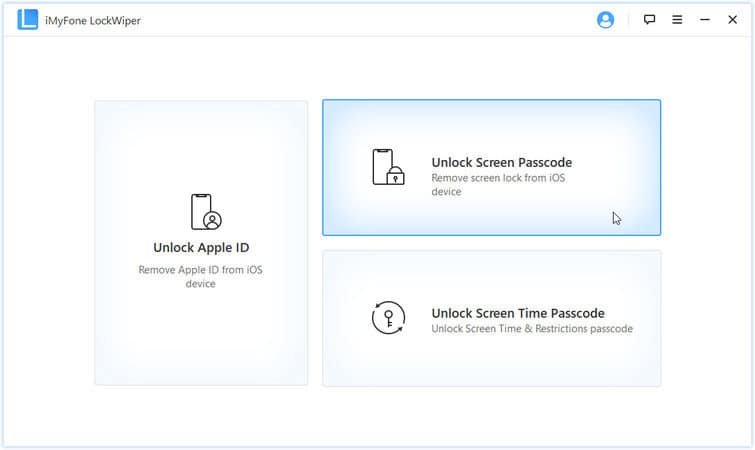
Step 2. The software panel shows several different sections. To fix disabled iPhone without iTunes, choose the “Unlock Screen Passcode” options.
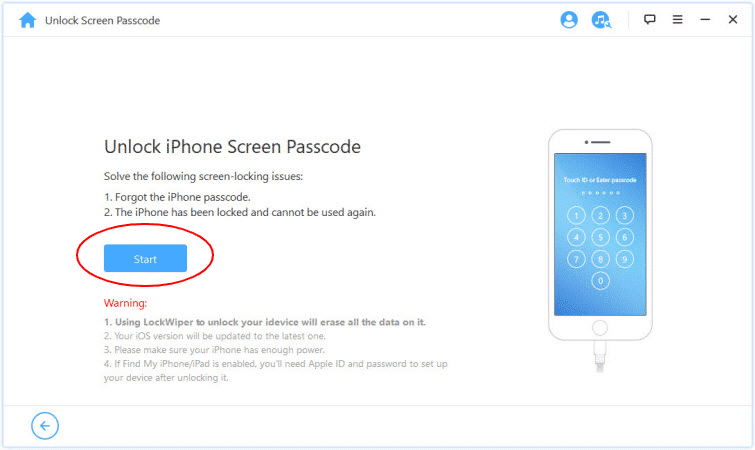
Step 3. Click the “Start” button on the next page.
Step 4. In a few seconds, the disabled iPhone gets detected by the LockWiper.
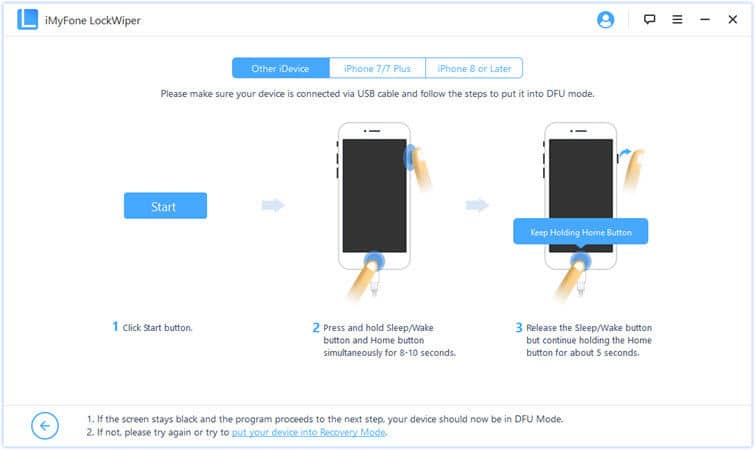
Step 5. If the tool takes a long time to detect your mobile, you can do it manually. You can follow the instructions to enter the Recovery mode, which are provided on the same page.
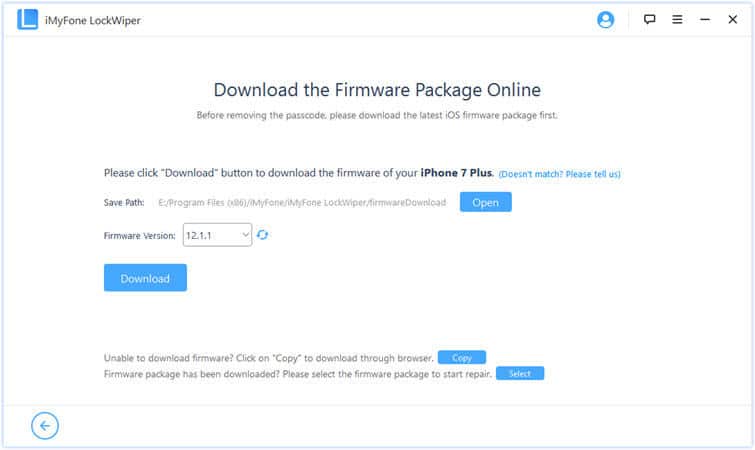
Step 6. The software panel shows the firmware version that is compatible with your iPhone.
Step 7. Hit the “Download” button to download the firmware. You can change the download location on your PC by clicking on the “Open” button to browse a new path.
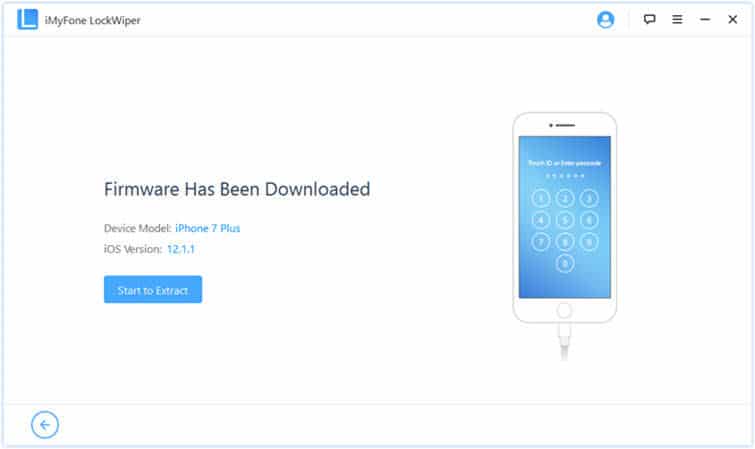
Step 8. A new page appears and shows “Firmware has been downloaded.” Click the “Start to Extract” button.
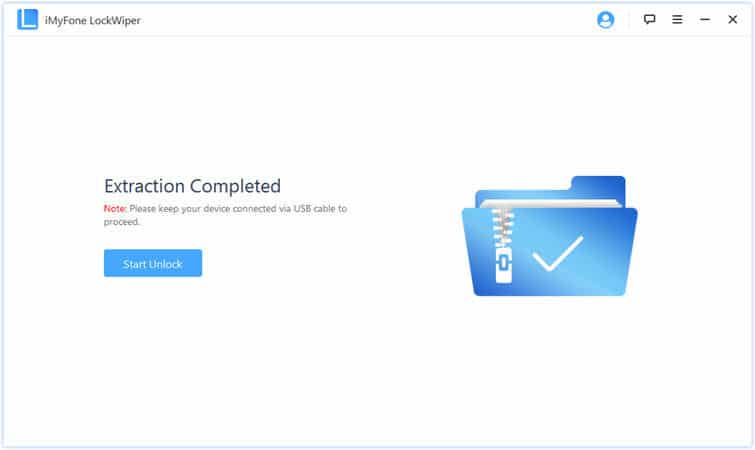
Step 9. Keep your iPhone connected and click the “Start Unlock” button after the extraction completes.
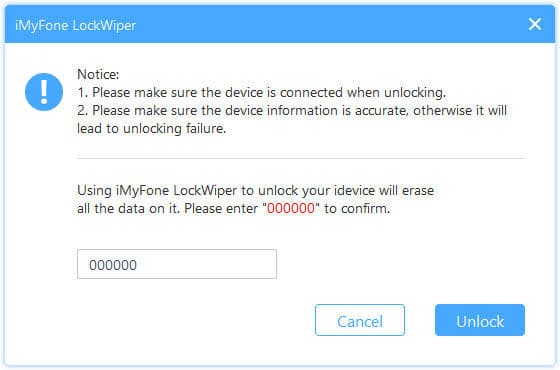
Step 10. A notice window appears that requests to type the code “000000” in a text box, which you can do without any hesitation and click on the “Unlock” button.
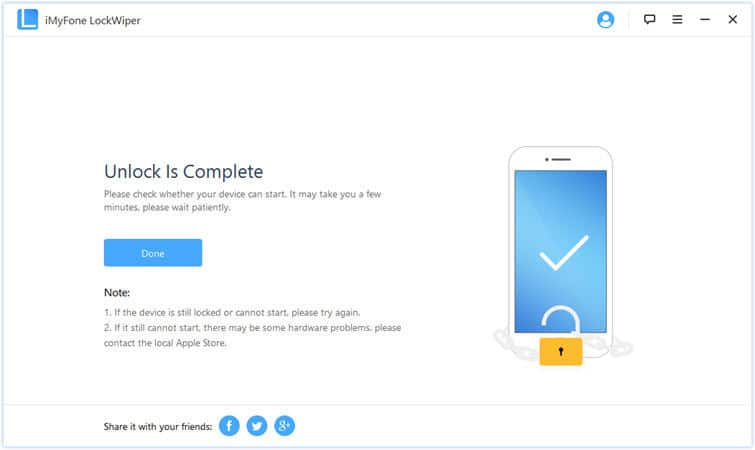
It will take a few minutes to unlock the disabled iPhone, and you can freely access your iPhone comfortably.
Method 2. Unlock A Disabled iPhone Without iTunes By Using iCloud
iCloud is an online application by Apple to help remotely or wirelessly connect with the iDevices for specific functions. iCloud’s primary usage is to locate the device on the map and is mostly used if it gets lost or stolen. iCloud employs the “Find My iPhone” feature to detect the device and can erase all the data from it. This option stands out as an alternative for iPhone disabled fix without iTunes as when everything gets deleted. Even the passcode is removed, leaving behind an unlocked & refreshed device.
While applying the iCloud method to unlock a disabled iPhone, the user must have kept the “Find My iPhone” option in an active state in the device. With that, if you do not remember the Apple ID & password, you will not be able to find your disabled iPhone for further processing.
Read the steps below to know how to fix disabled iPhone without iTunes by using iCloud.
Step 1. Open a web browser on a mobile device or computer.
Step 2. Go to the website icloud.com and sign-in using the Apple ID & password.
Step 3. From the options provided, click on the “Find My iPhone” section.
Step 4. Enter the “All Devices” section, which lists all the iDevices linked to this Apple ID.
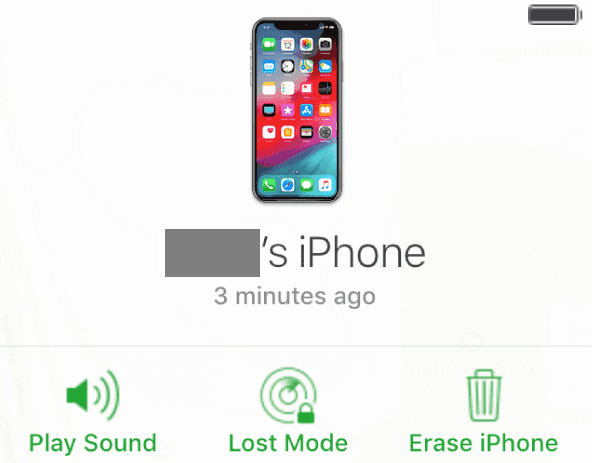
Step 5. In the new window showing your iPhone, hit the “Erase iPhone” button.
The above may take some time but will entirely erase the data and settings on your disabled iPhone and later unlock it for regular usage.
Method 3. Unlock A Disabled iPhone Without iTunes By Using Siri (iOS 8.0 – iOS 11)
Siri is an extraordinary functional assistant designed by Apple and is available on all new or old iOS devices. It works on receiving audible instructions given in natural language. A most common style used by many users is starting the phrase as “Hey Siri…” Unlocking a disabled iPhone with the help of Siri is neither an official nor an unofficial method, but is a loophole researched out by some geek technocrats.
Many people look out for iPhone disabled fix without iTunes, and they initially do not wish to go with any other iPhone passcode hack tool either. Since it is not a proper method, there isn’t any surety of getting the disabled iPhone unlocked successfully, but if by chance it worked, then you will be successful in saving the data and settings too.
The users find it interesting and wish to give it a try only for the sake of the data, and of course, it is free to use and does not even need a computer system. The whole process is quite complicated and results out as a complete-time waste in most cases, as it may not work all the time. But if you want to give it a try, make sure that the internet is pre-connected on the device and Siri is already activated. Now go through the process below to discover how to unlock a disabled iPhone without iTunes or iCloud.
Step 1. Pick your iPhone and long-press the “Home” button to turn On the Siri function.
Step 2. Give the command, “Hey Siri, what time is it.”
Step 3. Click on the clock icon that is shown on the screen.
Step 4. Now go to the World clock section and click on the “+” icon to add more clocks on the screen.
Step 5. A text box appears which requests a city name. Enter the name of any city and hit the “Select All” button.
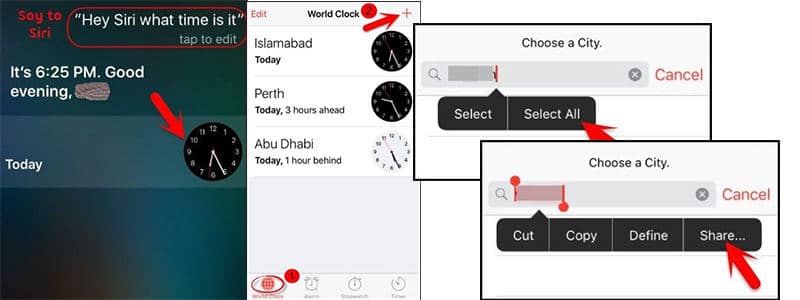
Step 6. Few more options appear below the box. Click on the “Share” button to get the sharing options available on your device.
Step 7. From the given options, choose and click over the “Message” icon.
Step 8. Type any name in the text box in the “To” section, and then hit the “return” button on the keyboard.
Step 9. The name you have typed gets highlighted. Select the title and click the “+” icon next to it to create contact.
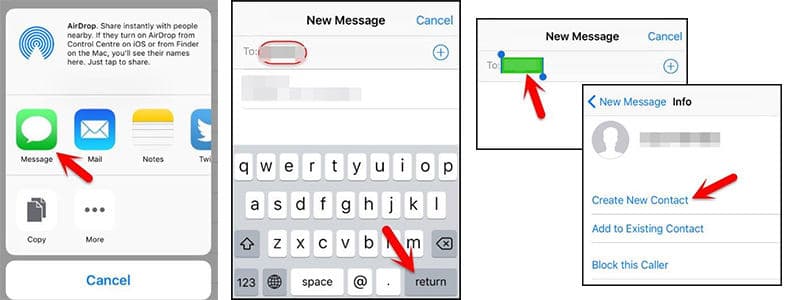
Step 10. On the proceeding, page click on the “Create New Contact” button to enter the “New Contact” section.
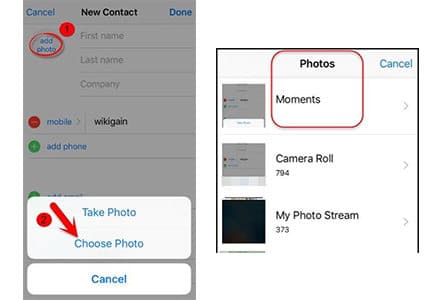
Step 11. Now click on the “Add Photo” option given above, and later select the “Choose Photo” option to go into the Photo Library.
Step 12. Enter into any photo album and finally hit the “Home” button.
The Home button will exit the whole setup, which will ultimately exit the locked and disabled screen. If it works as intended in your iPhone, you can simply check out your device and use it further, but you may get the same locked display again once the mobile is kept idle.
Extra Tips: Unlock Disabled iPhone With iTunes
iTunes has a feature of reset and restore to the iDevices and works only from a computer system. The company always recommended that all its users sync the iPhone with iTunes creating regular backup storage, as a precautionary step, which is helpful during such similar ill-happenings.
For implying iTunes to unlock a disabled iPhone, it would be better if the mobile has been synced with it earlier, or else iTunes will not help save or recover the data. A mandatory condition applied in this process is that the “Find My iPhone” function should be deactivated, or else the restore cannot occur. Hence if this feature is in the inactive state, you should check out ways for iPhone disabled fix without iTunes.
Since the iPhone is disabled because of a wrong passcode attempt, if it has happened accidentally, you can go with iTunes to that ask to enter the passcode for backup and restore. But if you do not remember the correct one, this process may take a longer time to completely erase the device and reset it for a fresh start. Follow the method given below to fix disabled iPhone with iTunes.
Step 1. Turn On your computer that already has the pre-synced iTunes application in it.
Step 2. Connect your disabled iPhone to the computer via USB cable and launch the iTunes program.
Step 3. Click the iPhone icon on the panel to get the device information displayed on the page.
Step 4. Click on the “Summary” button from the left column.
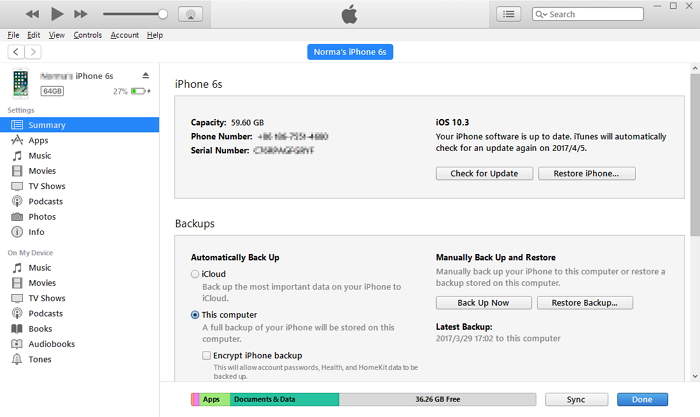
Step 5. Now come to the main section and hit the “Restore iPhone” button.
Step 6. A message board asks you to create a backup file for your device. Hit the “Back Up Now” button, which creates a backup.
Step 7. After the backup is created, click on the “Restore” button to start the unlocking process.
After the restore process finishes, which may take some time, you can choose the provided instructions to set up your device by reloading the data backup.
Conclusion
Your iPhone may encounter a deadly stage if it gets permanently locked because of a wrongly entered passcode when the screen says “iPhone is disabled, connect to iTunes.” iTunes works perfectly in ideal conditions if the problem is accidental. While the Siri or iCloud method is not very reliable and, in most cases, comes out as a waste of time. Sooner or later, the user has to look out for “iPhone disabled fix without iTunes or iCloud.”
iMyFone LockWiper, on the other hand, is a perfect solution for fixing a disabled iPhone without iTunes. It is an application developed by experienced technocrats who are experts in handling software issues or trembling scenarios. Millions of reviewers from around the world who are recommending iMyFone LockWiper are the most comfortable and most reliable resource to unlock a disabled iPhone without iTunes or iCloud.
Free TrialRelated posts
Recent Posts
- How to Turn Off Samsung Tablet without Password
- How to Make A Password Reset Disk for Another Computer
- How to Reset Password on Sony Vaio Laptop Windows 7/8/10
- How to Print A Secured PDF without Password
- How to Remove Read-Only from Excel
- How to Hack or Crack Password Protected PDF File
- How to Fix Windows 10’s Defaultuser0 Password Issue
- How to Disable Windows Hello Pin
- How to Make A Word Document Read Only
Related Posts
- How to Reset Screen Time Passcode on iPhone If You Forgot It
- How to Unlock iPhone 12/11/X/8/7/6/5S Passcode without Computer
- iPad is disabled? Why and How to Unlock Disabled iPad
- How to Unlock iPad Mini/Air/Pro without Passcode
- Locked Out of iPad? How to Reset A Locked iPad
- iPod is Disabled Connect to iTunes: How to Undisable an iPod?
- How to Get Into A Locked iPhone 11/X/8/7/6/5S without Password
- How To Turn Off Screen Lock On iPhone Without Password
- How to Bypass iPhone 12/11/X/8/7/6/5S Passcode
